Bridge pose is a gentle backbend where you lie on your back, bend your knees and lift your hips. It strengthens the legs and opens the chest and hips, and it can be adjusted with a low lift or a block. This guide shows how to do it step by step with safety notes.
This is general education, not medical advice. If you have neck or back problems, are pregnant or have a health condition, check with your doctor before trying this pose.
What is bridge pose?
Bridge pose, or setu bandhasana, is a gentle backbend where you lie on your back with knees bent and lift your hips toward the ceiling. It strengthens the legs and the muscles at the back of the body while opening the front of the hips and chest. It is a friendly, low risk pose for beginners when practised with care, and it has easy versions that need only a few inches of lift. It also makes a good warm up for deeper poses.
Why do beginners like it?
It is simple, done lying down, and it builds strength gently without needing balance or flexibility. You can feel the legs work and the chest open. It also gives a pleasant stretch after sitting. Our guide to yoga at your desk shows other quick relief for sitting days.
How do you do it step by step?
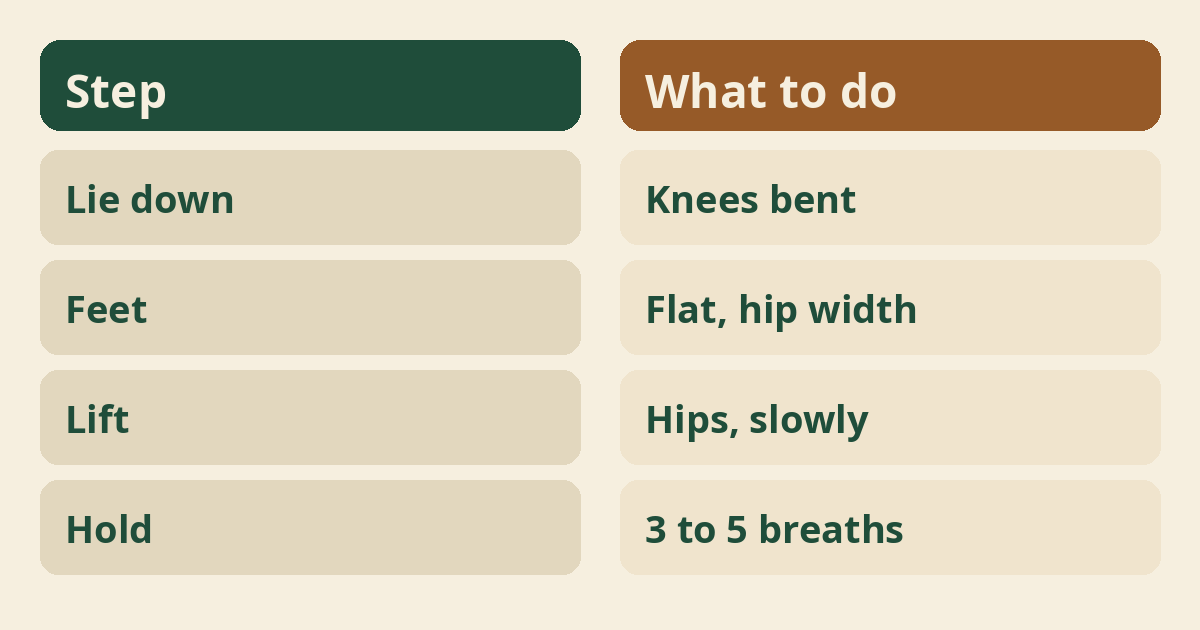
Lie on your back, bend the knees with feet flat and hip width apart, press the feet down and lift the hips, keeping the neck relaxed. Place the arms by your sides with palms down. Breathe out as you lift and in as you hold. Stay for three to five breaths. Lower slowly, one bone at a time, and rest.
Where should your feet be?
Place the feet close enough that you can just touch the heels with your fingertips, with the knees stacked over the ankles. If the feet are too far, the hamstrings take over. If too close, the knees may strain. Adjust until the legs feel steady and comfortable.
How high should you lift?
Lift only as high as you can hold comfortably with a smooth breath, even if that is just a few centimetres. A small lift still works. Do not arch the lower back. Keep the thighs parallel. The aim is steady strength, not height.
What should the neck and shoulders do?
Keep the head still, look at the ceiling and let the shoulders stay relaxed on the floor. Never turn the head while lifted. Our guide to yoga for neck and shoulders explains care for the neck. If the neck feels strained, lower the hips.
What do you do with the arms?
Rest them by the sides, or clasp the hands under the back if the shoulders are comfortable. Keep it simple at first. Clasping adds a shoulder stretch but is optional. Do not force it.
Supported bridge
Slide a block or firm cushion under the base of the spine and rest on it for one to three minutes. This restful version is easy on the back. Our guide to restorative yoga shows more supported poses. Choose a low height first.
Dynamic bridge
Lift the hips on the in breath and lower on the out breath for eight slow rounds. Moving with the breath warms the spine and builds control. Keep movement smooth. Our guide to belly breathing explains easy breathing.
Bridge with a block between the thighs
Squeeze a block or cushion gently between the thighs to wake up the inner legs. This helps keep the knees aligned. Use a soft cushion. Do not squeeze hard.
What are the benefits?
Many people feel stronger legs, an easier back and a more open chest with regular practice. Our guide to the benefits of yoga explains what yoga may offer. The National Center for Complementary and Integrative Health notes that research on yoga is still developing. Results vary.
Does it help with posture?
It strengthens the back of the body, which can support better sitting and standing habits. Our guide to yoga for posture explains simple habits. Posture changes slowly with regular practice.
Is it good for the back?
It can feel good for a tired back, but speak to a doctor first if you have back pain. Our guide to yoga for back pain and yoga with a bad back explain safe habits. Stop if pain increases.
Is it good for the hips?
It opens the front of the hips and wakes up the glutes, which help support the pelvis. Our guide to yoga for hips has more hip ideas. Keep the movement smooth and gentle.
What about the knees?
Keep the knees over the ankles and pointing forward, and ease off if you feel strain. Our guide to yoga for knees explains care for the knees. Lower the hips if the knees complain.
How long should you hold it?
Hold for three to five breaths, rest, and repeat two or three times. Short holds with rest are better for beginners. Our guide on how often to do yoga suggests how to build up. Add time slowly.
How do you come out?
Lower the spine slowly onto the mat, then hug the knees to the chest or rest with feet flat. Rest for a few breaths before moving on. Roll to one side to sit up. Move gently to avoid dizziness.
What are common mistakes?
Lifting too high, letting the knees fall out, turning the head and holding the breath. Keep the lift modest. Keep the feet planted. Breathe smoothly. Use a block for support if needed.
What poses pair well with it?
Cat and cow, a knees to chest hug and a gentle twist all go well before or after bridge. Our guide to cat and cow pose shows a good warm up. Finish with rest like in our guide to savasana.
Who should be careful?
People with neck injuries, back problems, pregnancy, high blood pressure or recent surgery should check with a doctor first. Our guide to prenatal yoga explains special care in pregnancy. Stop if you feel pain, dizziness or pressure in the head.
Can older adults practise it?
Yes with a low lift and support, but check with a doctor if you have concerns. Our guide to yoga after 50 shows gentle options. Choose a bed or firm surface you can get down to and up from comfortably.
When should you see a doctor?
See a doctor before starting if you have an injury, health condition, pregnancy or any concern. Stop if you feel pain, numbness or dizziness. This guide is general education, not medical advice.
How can you prepare the body?
Warm up with a few cat and cow rounds, some gentle hip circles and a knees to chest hug. A warm body lifts more easily and safely. Spend a minute or two moving slowly before you start. Notice if one side feels tighter. Our guide to a morning yoga routine shows an easy warm up.
How do you use the breath?
Breathe in to prepare, out as you lift, hold with smooth breaths and lower on the next out breath. Do not hold the breath. A calm breath keeps the neck and jaw soft. If you find yourself straining, lower down and start again with a smaller lift.
What should you feel?
You should feel the back of the legs and hips working and a gentle stretch across the front of the hips and chest. A sharp pinch in the lower back or neck is a sign to ease off. Stay in the zone of comfortable effort. Over weeks, the lift may feel stronger and steadier.
How can you make it harder, safely?
Hold a little longer, lift one heel for a moment or add a few more gentle rounds, only when the basic pose feels easy. Change one thing at a time. If you wobble or strain, go back to the simple version. There is no need to rush. Strong foundations help everything else you practise.
Can you do it every day?
Yes, a gentle version can be done most days, with rest if the back or hips feel tired. Keep it short and easy. Take a rest day if you feel sore. Listen to your body and let strength build slowly. Quality of each lift matters far more than how many you do.
Where to read next
For a calm, beginner-friendly start, Ranjana Sinha’s Begin Where You Are is written for people who want simple steps. Our guide to starting a home yoga practice adds a gentle routine you can follow at home.
Frequently asked questions
What is bridge pose good for?
Gentle strength for the legs and back and a soft opening for the chest and hips.
How high should I lift?
Only as high as feels comfortable and steady.
How long should I hold bridge pose?
Three to five breaths, repeated two or three times.
Is bridge pose safe for the back?
Usually when gentle, but speak to a doctor if you have back pain.
Can I use a block?
Yes. A block under the hips makes a restful version.
The bottom line
Bridge pose builds strength quietly. Start with a small lift, breathe smoothly and rest after each round.