By the end of a long day at a laptop, your shoulder blades ache and your upper back feels like a board. That tight spot between the shoulders is one of the most common places people notice discomfort. Yoga for upper back pain uses slow, low-impact movement and steady breathing to help you notice and ease that tension. This guide keeps everything simple and beginner friendly.
This article is general education about yoga and is not medical advice. If you have a health condition, an injury, or pain that is new or severe, please talk with your doctor before you try any of these ideas.
What is yoga for upper back pain?
It is a small set of slow movements and breathing habits aimed at the area between your neck and the middle of your spine. You move the shoulders, chest, and spine in easy ranges and pay attention to how each position feels. Nothing here needs to look perfect. The goal is comfort and awareness, not a fancy shape.
Why does the upper back get so tight?
Long hours in one position are a common reason the upper back feels stiff. Looking at a screen, driving, carrying a heavy bag, or hunching over a phone can leave the muscles around your shoulder blades working all day. Many people also hold their shoulders up when they feel rushed without noticing it.
Why do people try yoga for it?
People try yoga because it asks for slow movement and attention instead of force. Many find that a few quiet minutes of stretching and breathing helps them feel looser and more aware of how they sit. Results vary from person to person, and that is fine.
How do I start if I have never done yoga?
Start with five to ten minutes on a flat floor, wearing clothes you can move in. Pick a quiet corner and put down a mat or a folded blanket. Choose two or three easy poses from this guide and move through them once. Stop any time something feels sharp or wrong.
Do I need to be flexible first?
No, flexibility is something yoga may build over time, not a ticket to enter. A stiff back is a perfectly good place to begin. If you want a longer view of that goal later, read about building flexibility at a beginner pace. For now, small and slow is enough.
What should I check before my first session?
Check that nothing hurts more than a mild stretch and that you have room to lie down. Look at your space, your clothing, and your energy. If you feel dizzy, rushed, or very sore, wait for another day. A short, relaxed session beats a long one you push through.
Step 1: How do I begin with a seated breath?
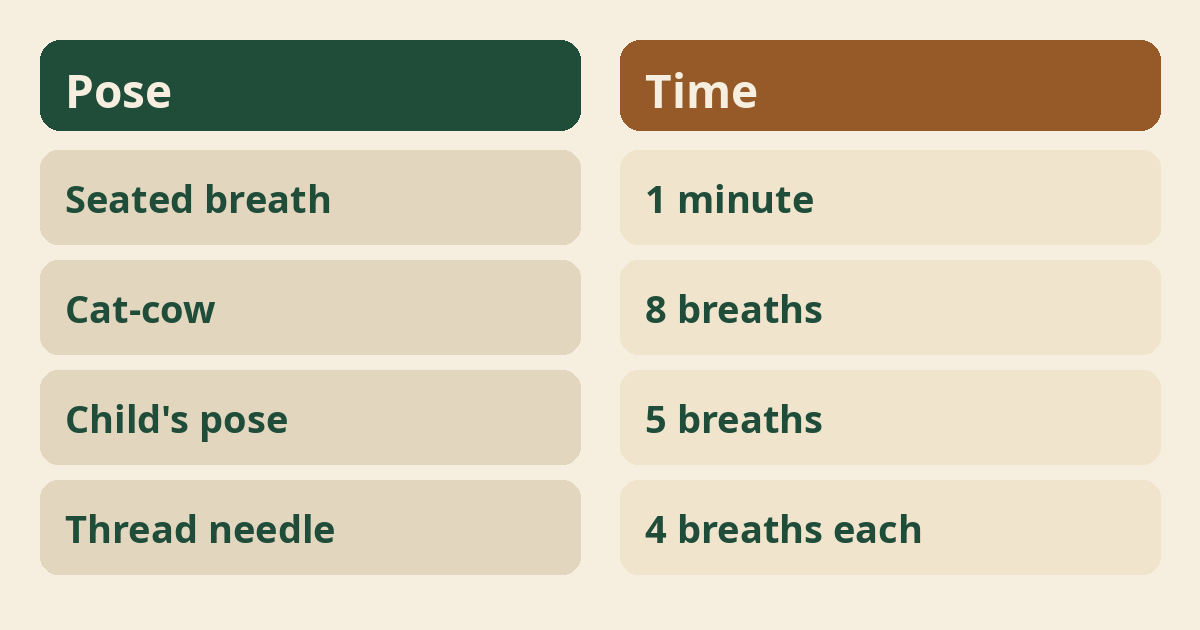
Sit tall on a chair or cushion and breathe slowly in through your nose. Rest your hands on your thighs and let your shoulders drop away from your ears. Take five slow breaths and feel your ribs widen at the back. This sets an easy pace for the rest of your practice.
Step 2: How do I do shoulder rolls?
Lift your shoulders toward your ears, roll them back, and let them drop. Move slowly for about eight rolls, then switch direction. Keep your neck relaxed and your jaw soft. If one direction feels odd, do fewer rolls. This warms up the muscles around the shoulder blades.
Step 3: How do I do cat-cow on hands and knees?
Come onto hands and knees and move your spine slowly between rounding and arching. Breathe in as you lift your chest a little, and breathe out as you round your back. Keep the range small if your upper back feels tender. You can find a full walk-through in this cat-cow guide for new students.
Step 4: How do I do child’s pose for the upper back?
Sit your hips back toward your heels and rest your arms long on the floor. Let your forehead rest on the mat or a pillow and feel your shoulder blades spread apart a little. Stay for five slow breaths. If your knees complain, read how to make child’s pose kinder on your body.
Step 5: How do I do thread the needle?
From hands and knees, slide one arm under your chest and rest your shoulder on the floor. Keep your hips over your knees and let your head hang loosely. Breathe for four or five slow breaths, then press back up and switch sides. Move less if you feel any pinching in the shoulder.
Step 6: How do I do puppy pose?
Walk your hands forward from hands and knees and lower your chest toward the floor. Keep your hips above your knees and your forehead down. This opens the chest and upper back without much effort. Our puppy pose guide shows ways to make it easier with a pillow under your chest.
How should I breathe during these poses?
Breathe slowly through your nose and let the breath move into your back ribs. When you breathe in, imagine the space between your shoulder blades widening. When you breathe out, let your body soften. If you feel strained, return to normal breathing. A simple primer is belly breathing for beginners.
Why does breathing matter for the upper back?
Slow breathing moves the ribs and the muscles around them, which sit right next to your upper back. Many people breathe in short, high breaths when they feel tense. Slowing down can make your whole upper body feel less guarded. It is a quiet habit that costs nothing and needs no equipment.
How long should one session last?
Five to fifteen minutes is plenty when you are starting out. A short session you finish feeling calm is better than a long one that leaves you sore. Add a few minutes only when your body feels comfortable and you want more. There is no prize for going longer.
How often can I practice?
Two to four short sessions a week is a reasonable place for most beginners to begin. Listen to how you feel the next morning. If you are sore, rest or go lighter. If you feel fine, you can add a day. For ideas on pacing, see how often to do yoga as a beginner.
Can I practice at my desk?
Yes, a few seated moves at your desk can fit into a busy day. Try shoulder rolls, a tall seated breath, and a slow twist of the chest. Take a short break from your screen every so often. A fuller routine is in yoga at your desk for beginners.
What is a good time of day?
Pick a time you can repeat, such as after work or before bed. Some people like a short stretch in the morning, others prefer the evening. Warm muscles often move more easily, so a few minutes after a warm shower can feel good. Choose what fits your life.
What are the most common mistakes?
The biggest mistakes are forcing a stretch, rushing, and holding your breath. Pushing deeper does not make a pose better. Move slowly, stay inside a comfortable range, and keep breathing. If you notice your jaw or shoulders clenching, ease off and start again with a smaller movement.
Should I stretch through pain?
No, a pose should never feel sharp, hot, or electric. A mild, easy stretch is normal, but real pain is a signal to stop. Back out of the pose, rest, and try a smaller version later. If the pain stays or returns, check in with your doctor.
Which props help the most?
A folded blanket, a pillow, and a cushion for sitting are the most useful props. A rolled towel under your chest or a cushion under your hips can make poses much easier. You do not need to buy anything fancy. More ideas are in yoga props for beginners.
Can I use a chair?
Yes, a sturdy chair makes many moves easier and is a fine choice. You can do seated breaths, shoulder rolls, and chest openers while sitting. A chair also helps if getting down to the floor is hard. Choose a chair that does not roll and keep both feet flat.
Who should be careful and check with a doctor first?
Anyone with an injury, a spine condition, numbness, or pain that is new or severe should talk with a doctor first. The same goes for people who are pregnant, recovering from surgery, or unsure about their health. Share what you plan to do and ask what to avoid. Stop and get medical help for chest pain, shortness of breath, or sudden changes.
What if the pain spreads or feels strange?
Tingling, numbness, or pain that spreads down an arm is a reason to pause and see a professional. Do not try to stretch it away. Describe what you feel and when it started so your doctor can help you decide what is safe. Yoga can wait until you have clear guidance.
Is yoga a treatment for upper back pain?
No, yoga is not a treatment, and this guide is not a plan for any medical condition. It is a way to move and breathe with care. Pain that lasts or keeps returning deserves a visit to a doctor or physical therapist. Yoga may sit beside that care, but it does not replace it.
What benefits might I notice?
Many people find that regular, easy practice leaves their back and shoulders feeling looser and their posture more relaxed. Results vary, and some people notice little at first. For a balanced look at what research bodies say about yoga in general, see National Center for Complementary and Integrative Health. Take any good feeling as a bonus, not a promise.
Can this help my posture?
Many people find that body awareness from yoga makes them notice how they sit and stand. When you feel your shoulders creeping up, you can drop them. Over time that habit may feel more natural. Posture is shaped by many things, including your work setup, so be patient with yourself.
How does the neck fit in?
The neck and upper back work as a team, so tension in one often shows up in the other. Keep your neck long and relaxed in every pose. When you are ready to spend more time there, try yoga for neck and shoulders as a next step.
What about the lower back?
The lower back has its own needs, so it is wise to give it separate attention. If your discomfort sits lower down, our cornerstone guide yoga-for-lower-back-pain covers it in detail. If you are unsure whether your back is safe to move, read can you do yoga with a bad back first.
How do I know when to move forward?
You are ready for more when your current poses feel easy and you leave each session feeling fine. Add one new pose at a time and hold each a little longer. A good next pose can be mountain pose, which teaches tall, relaxed standing. Go back a step if anything feels off.
Should I find a teacher?
A kind, qualified teacher can help you adjust poses and feel safer, especially with a sore back. Look for someone who welcomes beginners and lets you modify. Tell them where you feel tight before class begins. A good teacher never pushes you into a shape you do not want to be in.
What mindset helps most?
A patient, curious mindset helps more than effort. Think of each session as a quiet check-in rather than a test. Some days your back will feel better, some days stiffer, and both are normal. Think of your body as a friend you are getting to know.
How can I make it a habit?
Attach a short routine to something you already do, like brushing your teeth. Keep your mat or a blanket where you can see it. Start with three minutes if that is what you can manage. Small, repeated visits to your practice tend to last longer than big, rare ones.
What if I feel sore afterward?
Mild soreness the next day can happen, but sharp or lasting pain is not normal. Rest, drink some water, and go lighter next time. Use smaller ranges and shorter holds. If soreness lingers for days or worries you, ask your doctor before you continue.
Where to read next
For a calm, beginner-friendly start, Ranjana Sinha’s Begin Where You Are is written for people who want simple steps. Our guide to starting a home yoga practice adds a gentle routine you can follow at home.
Frequently asked questions
Is a chair okay if I cannot get down to the floor?
Yes, a steady chair works well for seated breaths, shoulder rolls, and easy chest openers.
What should I do if a pose pinches my shoulder?
Back out of it right away, try a smaller version, and skip it if the pinch returns.
Do I need special clothes or a mat?
No, comfortable clothes and a folded blanket on a non-slip floor are enough to begin.
Is it normal for the upper back to crack during movement?
Occasional popping without pain is common, but pain with the sound is worth mentioning to your doctor.
Can I practice if my back feels tight after a long day?
Yes, a few slow moves and easy breaths are fine as long as nothing feels sharp.
The bottom line
Go slowly, stay curious, and let your upper back set the pace.