Yoga for photographers is a simple way to ease the stiff neck, sore back, and tight wrists that come from carrying gear and holding a camera all day. You do not need to be flexible or fit to start. This guide shows you gentle beginner poses, easy breathing, and a short routine you can do before a shoot, after editing, or on a rest day. Everything here is slow, safe, and made for real working photographers.
This article is general education, not medical advice. If you have a health condition, an injury, or ongoing pain, check with your doctor before you start.
What is yoga for photographers?
Yoga for photographers is gentle stretching and breathing shaped around the aches of camera work. It focuses on the neck, shoulders, wrists, hips, and lower back. The moves are slow and beginner friendly, and most can be done at home with no special gear.
Why do photographers do yoga?
Many photographers use yoga to feel looser and less sore after long shoot days. Holding a camera, crouching for angles, and sitting through hours of editing can leave the body stiff. A short regular practice gives those tired spots some relief.
What hours behind a camera do to your body
Camera work loads the same small areas again and again. Shoulders round forward, wrists grip tight, and the lower back works hard when you crouch or carry bags. Over time this can feel like constant low-level tension.
Is yoga safe if you are new to it?
Gentle beginner yoga is safe for most healthy adults when you move slowly. Start with easy poses and short holds, and skip anything that hurts. A qualified teacher can check your form if you are unsure.
What you need to get started
You only need a mat, comfortable clothes, and a quiet corner of floor. A few simple props like blocks and a strap can make poses easier, and yoga props for beginners covers the basics. A folded blanket works fine in place of most gear.
How to start in five steps
A beginner session moves from a gentle warm-up to a deeper stretch and ends in rest. The five steps below take about fifteen minutes. Move slowly between each one and keep your breathing calm and steady.
Step one: loosen your neck and shoulders
Slow rolls and gentle stretches release the tension cameras put in your upper body. Drop your chin to your chest, then roll your head in a slow half circle. The moves in yoga for neck and shoulders pair well with this.
Step two: warm up your spine
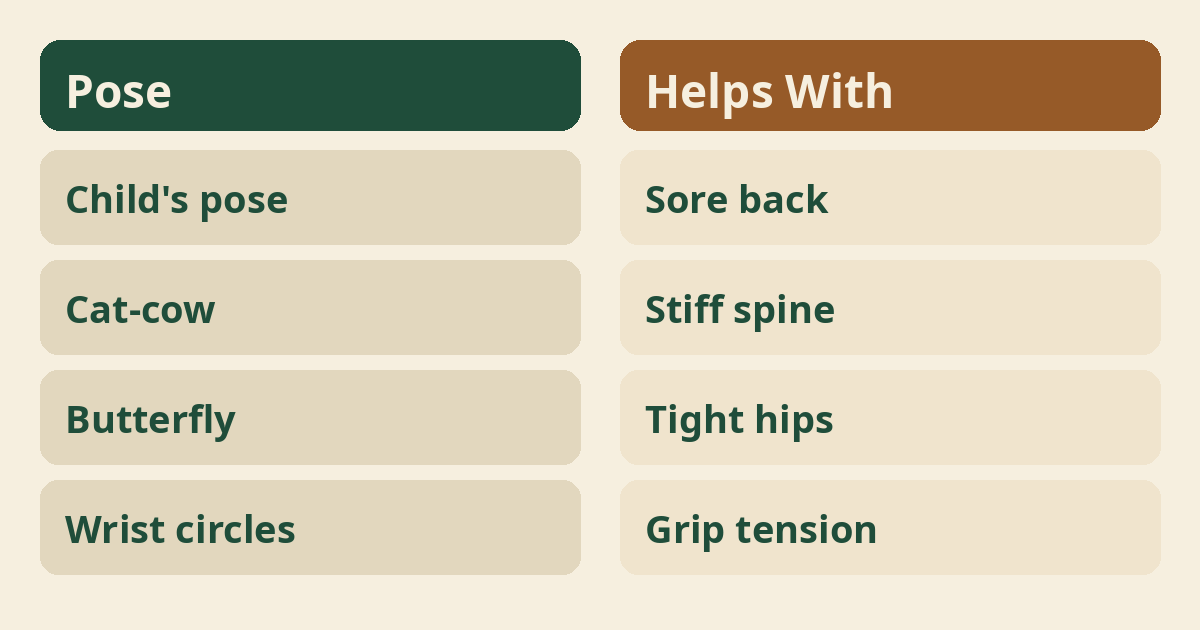
Cat-cow is a slow spinal wave that wakes up a stiff back. On hands and knees, arch as you breathe out and lift your chest as you breathe in. The full guide is at cat-cow pose for beginners.
Step three: rest in child’s pose
Child’s pose gently stretches the lower back and gives your shoulders a break. Kneel, fold forward, and rest your forehead on the mat. If it feels tight, child’s pose for beginners shows easy ways to prop it up.
Step four: open tight hips
A slow hip opener like butterfly pose eases stiffness from crouching and sitting. Sit tall, press the soles of your feet together, and let your knees fall out. Never force the knees down; let gravity do the work.
Step five: stand tall and breathe
Mountain pose resets your posture before you finish. Stand with feet hip width apart, roll your shoulders back, and take five slow breaths. Mountain pose for beginners walks through the small alignment cues.
How to breathe during practice
Slow belly breathing keeps your body relaxed in every pose. Rest a hand on your stomach and let it rise as you breathe in. Belly breathing for beginners explains the basics if this feels new.
How long should a session be?
Ten to twenty minutes is plenty for a beginner session. Short sessions done often beat one long session done rarely. Stop a little before you feel tired so the practice stays pleasant.
How often should you practice?
Most beginners do well with three to five short sessions a week. Daily practice is fine if the sessions stay gentle. The guide on how often should you do yoga helps you find your rhythm.
Common mistakes beginners make
The biggest mistake is pushing into pain to reach a deeper stretch. Other common ones are holding your breath, comparing yourself to others, and skipping rest days. A pose should feel like effort, never like a pinch.
Props that make poses easier
Blocks, straps, and blankets bring the floor closer and soften hard stretches. Sit on a folded blanket in seated poses to free your hips. A strap around your feet helps when your hands cannot reach.
Who should check with a doctor first?
Anyone with an injury, recent surgery, or ongoing pain should talk to a doctor first. This includes back, wrist, and shoulder problems that camera work can aggravate. If your back already bothers you, can you do yoga with a bad back is a careful place to start.
Is yoga a treatment for pain?
No, yoga is not a treatment and it does not replace medical care. It is a gentle movement practice that many people enjoy alongside their normal care. Diagnosis and treatment belong with your doctor.
What benefits do people report?
Many people find that regular gentle yoga leaves them feeling looser and calmer, though results vary. Some notice easier movement on shoot days and less tension after editing. Research groups like National Center for Complementary and Integrative Health study yoga, and findings so far suggest it can support comfort and relaxation for some people.
How to progress over time
Progress means holding poses a little longer and moving with more control. Add a minute or a new pose every week or two, not every day. Slow progress keeps the practice safe and enjoyable.
Should you work with a teacher?
A few sessions with a qualified teacher can fix small form problems early. Look for someone experienced with beginners who asks about injuries. Online beginner classes are a fine start if a studio is not nearby.
The right mindset for practice
Treat yoga as maintenance for your working body, not a performance. Some days you will feel stiff, and that is normal. Showing up gently matters more than how any single pose looks.
Quick moves at your editing desk
A few seated stretches between edits keep stiffness from building up. Roll your shoulders, stretch your wrists, and turn gently side to side in your chair. Yoga at your desk for beginners has a full set of desk friendly moves.
Caring for your wrists and hands
Gentle wrist circles and finger stretches ease the grip tension of holding a camera. Make soft fists, open your hands wide, then circle each wrist slowly ten times. Keep every move smooth and painless.
Easing a tired upper back
Rounded shoulders from shooting and editing respond well to slow chest openers. Interlace your fingers behind your back and lift your arms a little as you breathe. Puppy pose, covered in puppy pose for beginners, also softens this area nicely.
Hips after crouching and kneeling
Deep hip openers help after a day of low angles and floor work. Garland pose is a deep squat that opens the hips gently; see garland pose for beginners for a supported version. Yoga for hips for beginners offers more options.
Balance for uneven ground
Better balance helps you stay steady while shooting on slopes or sand. Simple standing poses build it slowly, and yoga for balance for beginners is a good next read. Practice near a wall until you feel stable.
Calming nerves before a big shoot
Slow breathing before a shoot settles nerves and steadies your hands. Take ten long breaths with a longer out-breath than in-breath. Yoga for stress relief for beginners goes deeper on this.
A short routine before a shoot
Five minutes of movement before shooting warms up the areas you will use most. Try shoulder rolls, cat-cow, wrist circles, and a few slow breaths. Keep it easy so you start the day loose, not tired.
A gentle cooldown after editing
An evening cooldown tells your body the work day is over. Child’s pose, a slow seated twist, and butterfly pose work well. Dim lights and quiet breathing make it easier to wind down.
Can you do this while pregnant?
Pregnant photographers should switch to prenatal yoga and check with their doctor first. Some poses on this list are not right for pregnancy. Prenatal yoga vs regular yoga explains the key differences.
Building a simple weekly routine
A weekly plan removes the daily question of whether to practice. Pick three set days and a set ten minutes, like before breakfast or after work. Attach the habit to something you already do.
Signs you are pushing too hard
Sharp pain, tingling, or soreness that lasts for days means back off. Mild effort and gentle stretching are fine, but pain is a stop signal. Rest, shorten your sessions, and see a doctor if pain persists.
How to keep the habit going
Keep the habit by making sessions short, easy, and simple to start. Leave your mat where you can see it and count any session as a win. Missed days are normal; just begin again tomorrow.
Where to read next
For a calm, beginner-friendly start, Ranjana Sinha’s Begin Where You Are is written for people who want simple steps. Our guide to starting a home yoga practice adds a gentle routine you can follow at home.
Frequently asked questions
Do I need to be flexible to start?
No, beginners start exactly where they are and props make every pose easier.
How soon will I feel a difference?
Many people feel a little looser after the first few sessions, though results vary.
Is ten minutes really enough?
Yes, short regular sessions help more than rare long ones.
Can yoga replace physical therapy?
No, yoga is not a treatment and does not replace care from a doctor or therapist.
Do I need a yoga mat?
A mat helps with grip and comfort, but a carpet or folded blanket works to start.
The bottom line
Give your body the same care you give your gear, and it will carry you through many more shoots.