Pigeon pose is a hip-opening pose with one leg bent in front and the other stretched back. Beginners can start with reclined pigeon or a figure-four stretch, use props under the hip, hold five to ten breaths and stop if the knee hurts.
This is general education, not medical advice. If you have knee, hip or sacroiliac joint issues, recent surgery or are pregnant, check with your doctor before practising.
What is pigeon pose?
Pigeon pose, or eka pada rajakapotasana in its fuller form, is a hip-opening pose where one leg is bent in front of you and the other stretches behind. It is popular for the deep stretch it can give the outer hips, a place that gets tight from sitting. It can be intense, so beginners often start with an easier version, such as reclined pigeon or figure-four stretch. It is a good companion to the gentle poses in our guide to yoga for flexibility.
How do you do pigeon pose step by step?
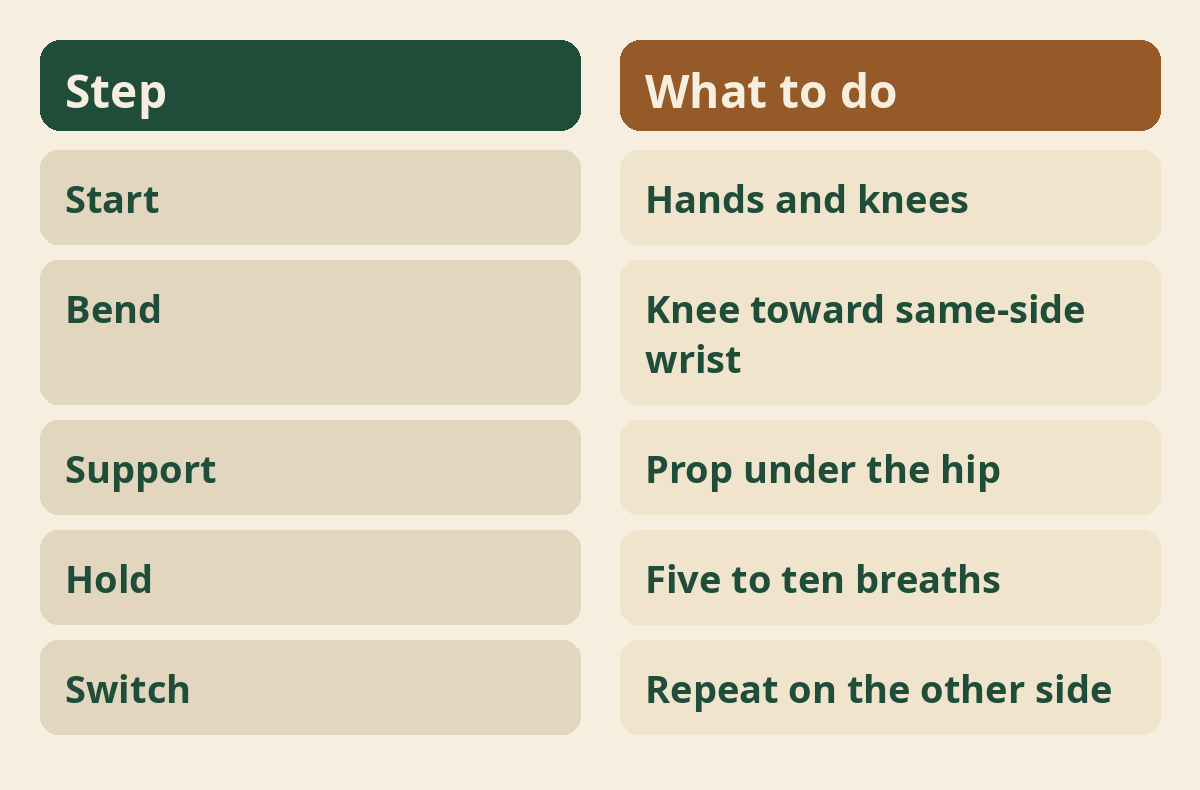
From hands and knees, slide one knee toward the same-side wrist, stretch the other leg back, square the hips and fold forward with support. Move slowly and use props under the hip.
- Start on hands and knees.
- Slide your right knee forward toward your right wrist and angle the shin across the mat as comfortable.
- Stretch your left leg straight back with the top of the foot on the mat.
- Place a folded blanket or block under your right hip if it does not reach the floor.
- Keep your hips level and your spine long.
- Stay upright on your hands, or fold forward onto your forearms or a cushion.
- Hold for five to ten breaths, then press back and switch sides.
What should you feel?
You should feel a deep but tolerable stretch in the outer hip and buttock, and not in the knee. If you feel pain in the knee, you need to adjust or use a different pose. A stretch should feel like a steady pull, not a sharp or pinching sensation. If your lower back feels strained, prop up the hip higher.
Why do people like pigeon pose?
It stretches the hips, which can feel good after long periods of sitting or exercise such as running. The National Center for Complementary and Integrative Health describes yoga as a mind and body practice. Many classes include hip-opening poses. Pigeon is not a treatment for any condition. Our guide to the benefits of yoga explains more about what a regular practice can offer.
What is an easier version?
Reclined pigeon, also called figure four, is gentler and kinder on the knees. Lie on your back with your knees bent. Cross your right ankle over your left thigh and gently pull the left thigh toward you. The head stays on the floor and the back is supported. It gives a similar stretch with less strain.
What props help?
A folded blanket under the hip, a block under the thigh or a bolster under the chest all make the pose safer. Props bring the floor closer. They help you keep the hips level and relax into the stretch. Using props is not a sign of weakness. Choose the support that lets you breathe easily.
How long should you hold?
Hold for five to ten slow breaths, or up to a minute if you are comfortable, then switch sides. Shorter holds are fine. Do not push beyond your range. Move out of the pose slowly. Repeat on the other side so both hips get equal attention.
What if your knee hurts?
Come out of the pose, try reclined pigeon or choose a different hip stretch. Knee pain is a clear sign to stop. The knee is a hinge joint and does not like twisting. Never force the foot or shin into position. If you have a knee injury, speak with a doctor or physiotherapist first.
What if your hips feel too tight?
Use a higher prop, reduce the angle of the shin or practise reclined pigeon until your hips loosen. Tight hips are common. Try other gentle poses such as child’s pose or low lunge first. See our guide to child’s pose for a restful way to ease in. Progress is gradual.
What are common mistakes?
Common mistakes include collapsing onto one hip, forcing the shin parallel to the front of the mat, holding the breath and pushing through knee pain. Another is ignoring the lower back. Keep the hips level with a prop. Relax the shoulders. If you feel any joint pain, back out. Slow, supported work gives better results.
How does breathing help?
Slow breathing helps the muscles soften, and many people find each exhale lets them settle a little deeper. Do not hold your breath. Keep your face and jaw soft. If your breathing becomes tense, ease off. Our guide to pranayama has simple breathing practices.
When should you practise it?
After a warm-up, such as a few rounds of cat and cow or a sun salutation, when your hips are warm. Avoid cold hips and deep stretches. You can also practise after a walk or a run. It is a good evening pose, as in our evening yoga routine. Keep it gentle before bed.
Who should be careful?
People with knee, hip or sacroiliac joint issues, recent surgery or pregnancy should talk with a doctor first. Hypermobile people should avoid pushing too far. This guide is general education and not medical advice. Our guide to prenatal yoga covers care in pregnancy.
Is pigeon pose good for the back?
It can feel good for a tight lower back or hips, but it is not a treatment for back pain. Keep the hips level and avoid forcing the stretch. If you have back pain, ask your doctor first. Our guides to yoga for back pain and yoga with a bad back explain more.
How is it different from a figure-four stretch?
Figure four is done lying down and is gentler, while pigeon is done on the floor with the body folded forward. Both stretch the outer hip. Figure four allows more control over the angle and is easier on the knee. Beginners often start with it. You can use the same ankle-over-thigh shape in a chair, as in our chair yoga guide.
Can you do pigeon pose in a chair?
Yes, sit tall, cross one ankle over the opposite knee and lean forward gently. This seated version stretches the outer hip and is easy on the back. Keep your spine long. Do not force the knee downward. Hold for several breaths on each side.
How can you build a hip routine?
Combine a few gentle poses, such as low lunge, cat and cow, figure four and child’s pose, for ten to fifteen minutes. Practise two or three times a week. Warm up first. Move slowly. Rest between poses. A regular routine helps more than an occasional deep stretch.
How can you stay safe?
Warm up, use props, stay within a comfortable range and stop if you feel pain. Never bounce into the pose. Do not twist your knee. If you feel numbness or tingling, come out. A qualified teacher can check your alignment and suggest changes.
What should you expect over time?
You may notice your hips feel looser, but results vary, and pigeon pose is not a cure for any condition. Be patient. If you have ongoing hip or back pain, speak with a doctor or physiotherapist. Enjoy the stretch in a relaxed way.
What should you do after the pose?
Rest on your back with your knees bent, take a few slow breaths and notice how your hips feel. Move gently. Hug your knees to your chest if that feels good. Drink water. Avoid standing up too fast. Rest for a moment before moving on.
How can you add relaxation?
Stay for a few extra breaths with your eyes closed, then finish with a short rest. Our guide to savasana explains how to rest at the end of practice. Let the hips feel heavy and soft. This pairing can feel calming.
Where to read next
For a calm, beginner-friendly start, Ranjana Sinha’s Begin Where You Are is written for people who want simple steps. Our guide to starting a home yoga practice adds a gentle routine you can follow at home.
Frequently asked questions
Is pigeon pose good for beginners?
Reclined pigeon or figure four is a better start. The full pose needs open hips.
How long should I hold pigeon pose?
Five to ten breaths on each side, or up to a minute if comfortable.
My knee hurts in pigeon. What should I do?
Stop and try reclined pigeon or another stretch. Speak with a doctor if pain continues.
What props can I use?
A folded blanket, a block or a bolster under the hip or chest.
Can I do pigeon pose when pregnant?
Ask your doctor first. Modified hip stretches are often used instead.
The bottom line
Pigeon pose can be a deep hip stretch, so go gently. Use props, keep your knees safe and breathe. An easier version is just as valuable.