Crow pose prep means learning to support some of your weight on your hands before you try lifting both feet. Start with comfortable wrists, a steady squat, and small forward shifts while your toes stay down. You do not need to balance in the full pose to make this practice worthwhile. This guide breaks the work into short steps, explains useful props, and shows when to stay with simpler options. The aim is steady exploration, not getting airborne at any cost.
This guide offers general education, not medical advice or a personal exercise plan. Check with your doctor before trying arm balances if you have a health condition, an injury, recent surgery, or concerns about whether weight-bearing exercise is suitable for you.
What is crow pose prep?
Crow pose prep is a group of small drills that introduce hand support, a rounded upper back, and forward weight shifts. In the full balance, the knees rest against the upper arms and the feet leave the floor. Preparation lets you explore those parts separately, with your toes available as a steady base throughout.
Why do people practice it?
People practice crow preparation to explore arm balancing without making the full pose the only goal. The drills ask you to notice hand pressure, body position, and your response to uncertainty. Some people enjoy that focused challenge, while others prefer simpler standing balances or floor poses. Neither choice makes a practice more valid.
How should you start?
Start with a short, easy warm-up rather than testing your balance with cold hands and shoulders. Walk around, move your fingers, and make small shoulder circles before coming onto all fours. Try a gentle cat-cow sequence if comfortable, keeping the movement small enough that you can breathe without strain.
Step 1: Prepare your wrists
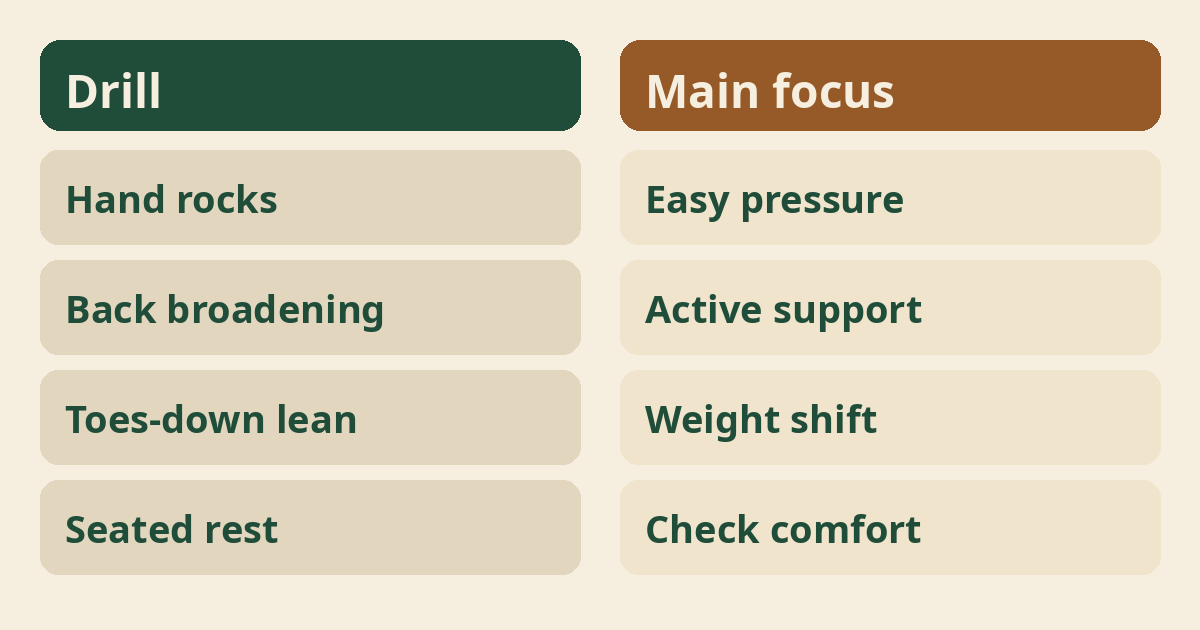
Introduce hand pressure gradually with small rocking movements on all fours. Spread your fingers comfortably and keep your palms down while shifting your body a little forward and back. Stay within an easy range rather than forcing a deep wrist bend; pain, tingling, or numbness means stop the drill rather than stretch harder.
Step 2: Find active shoulders
Press the floor away so your upper back feels broad instead of sinking between your shoulders. Practice this on all fours with straight but unforced arms, then release without dropping your chest suddenly. Keep your neck long and your jaw relaxed; you are learning how to support your trunk, not trying to squeeze your shoulder blades together.
Step 3: Explore your squat
Find a supported squat that lets you bring your knees toward your upper arms without forcing your hips. Let your heels lift if needed and keep your hands available for support. A comfortable garland pose variation may help you explore the shape, but a deep squat is not a test you must pass.
Step 4: Set your hands
Place your hands about shoulder-width apart on a firm, nonslip surface in front of your feet. Spread your fingers without stretching them rigidly, with middle fingers pointing forward or slightly outward if comfortable. Press through the palms and finger pads, then check that you can keep that contact while bending your elbows a little.
Step 5: Place your knees
Bring your knees against the backs of your upper arms, above the elbows, while keeping your toes down. Bend your elbows back rather than flaring them widely, and explore a small forward shift. If the knees slide or the position hurts, step out and reset instead of squeezing harder or trying to launch into balance.
Step 6: Shift before lifting
Move your chest forward a little at a time, keeping both feet in contact with the floor. Look at a spot slightly ahead of your hands without throwing your head back. When the shift feels controlled, you may briefly lighten one foot, put it down, and change sides; lifting both feet is optional, not the next required step.
How should you breathe?
Keep breathing freely throughout every preparation drill and come out if you start holding your breath. Take a comfortable breath before shifting forward, then let the next breath happen without forcing a count. You can explore easy belly breathing while seated afterward, but do not push your belly against your thighs to make a large breath.
Where should you look?
Aim your gaze a little ahead of your hands while keeping your neck comfortable. Looking directly back at your feet may encourage your head and chest to drop, while looking far ahead can strain your neck. Choose a clear spot on the floor and let your eyes settle there without treating your gaze as a guarantee against falling.
How long should a drill last?
Keep each attempt short enough that you can leave the position deliberately. A few calm breaths in a toes-down setup may be plenty, especially when your hands are new to bearing weight. Rest between attempts and finish before fatigue makes your elbows wobble, your palms lift, or your movements turn hurried and hard to control.
How often should you practice?
Begin with occasional short sessions and allow time to notice how your wrists and shoulders feel afterward. Some beginners may prefer two brief sessions in a week rather than daily attempts, but there is no universal schedule. Use guidance on yoga frequency to think about recovery alongside the rest of your movement routine.
What makes a useful practice session?
A useful session includes preparation, a few controlled attempts, and a clear stopping point. You might warm up on all fours, explore the squat, and try several toes-down shifts before resting. Repeating only the hardest part can leave you tired without teaching much; finishing with a steadier setup is a worthwhile result even when neither foot lifts.
Which props help?
Props can make the setup easier to explore, but they cannot make an arm balance risk-free. A stable block beneath the feet may help some people bring their knees onto their arms, although it also changes the balance and may increase the forward tipping risk. Read beginner yoga prop guidance and ask a teacher before adding height.
Should you use a cushion?
A cushion placed ahead of you may soften minor contact, but it is not reliable fall protection. Keep your hands on firm ground rather than on a thick cushion that can wobble or slide. Do not aim your head at the cushion or rest your forehead on it; if you feel close to tipping, keep your toes down and seek guidance.
Is a wall a good helper?
A wall is not a substitute for learning controlled weight shifts and a safe exit. Putting your head toward a wall can create another hard surface to hit, and a crowded corner limits movement. For solo practice, choose a clear area and stay with grounded drills rather than building a wall arrangement from guesswork or copied pictures.
Who should be careful?
Ask your doctor first if you have wrist, elbow, shoulder, neck, or back concerns, or another condition that could affect safe exercise. Pregnancy, recent surgery, balance problems, and a history of fainting also call for personal guidance before arm balancing. A yoga teacher can adapt a cleared practice, but cannot replace medical advice about your situation.
Is this a treatment?
Crow pose prep is not a treatment for pain, anxiety, weakness, or any medical condition. It is an optional movement practice that some people enjoy as part of yoga. Do not use it to test an injury, work through unexplained symptoms, or replace care recommended by your clinician; feeling challenged is not evidence that a problem is being fixed.
What benefits might you notice?
Many people find that careful practice builds confidence in using their hands for support, though results vary. You may become more aware of balance shifts and how your shoulders respond to load. Broad yoga information at National Center for Complementary and Integrative Health can offer context, but general findings about yoga should not be taken as proof of benefits from crow preparation specifically.
What are common mistakes?
Common mistakes include jumping, gripping with tense shoulders, rushing the lean, and staying after control fades. Trying to pull both feet up before shifting enough weight can turn the attempt into a sudden hop. Return to toes-down practice and reduce the movement until you can notice the shift instead of relying on momentum to get your feet airborne.
How do you exit?
For early practice, keep the feet close to the floor and return them gently before fatigue changes your position. Shift back into your squat, release the knees from the arms, and stand or sit carefully. If you cannot picture a controlled return, do not lift both feet; ask a teacher to help you practice entering and leaving safely.
What if your wrists hurt?
Stop hand-bearing drills if your wrists hurt rather than trying to warm the pain away. Rest in a comfortable position without loading your hands and note whether the discomfort settles. Seek medical advice for persistent or recurring pain, swelling, tingling, or numbness; changing your hand angle repeatedly is not a good way to diagnose what is wrong.
What if your knees slip?
Slipping knees are a reason to reset your contact and reduce the challenge, not to squeeze through discomfort. Bare skin or close-fitting clothing may feel different from loose, slippery fabric, and sweat can change grip. Wipe the area, keep your toes down, and ask a teacher to check placement if you keep sliding despite a calm setup.
What if your feet never lift?
Keeping your feet down is a complete and useful form of crow preparation. You can explore steady hand pressure, a broad upper back, and small shifts without reaching the full balance. There is no need to add a hop to prove progress; clearer control over a smaller movement is often more useful than a brief, accidental lift.
Do you need strong arms first?
Crow involves coordinated support from the hands, arms, shoulders, and trunk rather than arm effort alone. Strength matters, but body proportions, comfortable joint range, and how you shift your weight also shape the experience. Work with manageable drills instead of deciding that one failed attempt proves you are weak or that more force will solve the position.
Do you need flexible hips?
Comfortable hip movement can help the setup, but forcing a deeper squat is not the answer. Let your squat stay as high as needed while you explore where your knees can rest without strain. Gentle hip movement options may fit elsewhere in your practice, without becoming a promise that crow will suddenly feel easy.
How can you progress?
Progress by changing one small part only after the current version feels controlled and repeatable. That might mean a slightly longer toes-down shift, a calmer return, or briefly lightening one foot before replacing it. Do not increase time, add height, and lift both feet together simply because a previous attempt happened to work once.
When should a teacher help?
A qualified yoga teacher can help when you cannot find comfortable contact or feel unsure about entering and leaving. Ask for a session focused on preparation, not a promise to achieve crow immediately. Explain injuries, medical advice, and any fear of falling before you begin; hands-on help should happen only with your agreement and clear communication.
What mindset helps?
Treat crow as an optional skill rather than a measure of whether you are good at yoga. Fear, frustration, and comparison can make you rush a movement that needs patience. Choose a small goal you can influence, such as setting your palms carefully, and allow the session to end there even if someone nearby is doing a harder balance.
What can you do instead?
Standing balance or seated movement can be better choices when hand-bearing work is uncomfortable or unwelcome. Explore beginner balance practice near stable support, or choose a simple seated sequence that suits your needs. You do not have to replace crow with another difficult pose; choosing a manageable practice is a skill of its own.
How do you finish?
Finish by taking weight off your hands and returning to an easy position. Sit comfortably, open and close your fingers gently, and notice how your wrists and shoulders feel without stretching them hard. A supported child’s pose variation may suit some people, while others will prefer sitting upright with their hands resting in their lap.
How do you track progress?
Track comfort, control, and recovery rather than counting only seconds with your feet lifted. Note whether you could breathe easily, keep your palms grounded, and return without dropping your feet. If discomfort appears later or the next day, scale back and get advice when needed; a longer hold is not progress when it leaves you sore or worried.
Where to read next
For a calm, beginner-friendly start, Ranjana Sinha’s Begin Where You Are is written for people who want simple steps. Our guide to starting a home yoga practice adds a gentle routine you can follow at home.
Frequently asked questions
Can complete beginners try crow pose prep?
Beginners can explore gentle grounded drills if these are suitable for them, without attempting the full balance.
Do both feet need to leave the floor?
No, keeping both toes down is a valid way to practice the setup and weight shift.
Should I jump into crow pose?
No, use small controlled shifts rather than a jump, and stay grounded if you cannot leave the position deliberately.
Can I practice crow with wrist pain?
Stop hand-bearing practice and ask a healthcare professional about recurring or persistent wrist pain before continuing.
How soon will I learn crow?
There is no reliable timeline, and you may choose to stay with preparation rather than work toward the full pose.
The bottom line
Let steady hands, easy breathing, and a controlled return matter more than whether your feet leave the floor.