This reference explains the main kriya yoga techniques in plain words so you can start learning them safely at home. Maybe you read about kriya yoga in a book, or a friend said the breathing practice settled their busy mind, and now you want to know what people actually do on the mat. Below you will find the core techniques, step-by-step guidance, honest safety notes, and a simple way to build the practice into your week.
This article is general education, not medical advice for any individual. If you have a health condition, are pregnant, or take regular medication, talk with your doctor before trying breathwork or new movement.
What kriya yoga is
Kriya yoga is a family of techniques that combine breath control, steady posture, and quiet attention. The word covers a method rather than a single pose or stretch. A typical session moves through breathing exercises, a few held postures, and seated meditation in one arc. Many lineages teach their own sequence, yet they share the same building blocks. You can think of kriya as a toolkit for calming the body and steadying the mind. This reference covers the pieces most beginners meet first.
Where the word kriya comes from
Kriya is a Sanskrit word that means action or deed. In yoga writing it points to practices you actively do rather than ideas you only read about. Old texts used it for cleansing acts and disciplined daily practice. Modern teachers use it for structured breath and meditation routines. The shared idea is simple: change follows from doing, not only from knowing. That is why kriya classes focus on technique from the very first day.
What makes a technique a kriya
A kriya combines several elements, usually breath, posture, and focus, done in a set order for a set time. One breathing drill on its own is a building block. When you pair that breath with a hand position, a seated posture, and a fixed count of rounds, it becomes a kriya. The fixed structure is the point. You repeat the same pattern each session so the body learns it deeply. Beginners do best when they copy the pattern exactly before adjusting anything.
Why people learn kriya yoga
Most people come to kriya yoga wanting a calmer mind, steadier energy, or a daily routine that feels meaningful. Some arrive through stress or poor sleep and look for a practical way to unwind. Others are drawn to the meditation side after years of only physical yoga. Many like that a session has a clear beginning, middle, and end. Results vary from person to person, and the practice asks for patience. What it reliably offers is a structured way to sit with yourself each day.
The main kriya yoga techniques at a glance
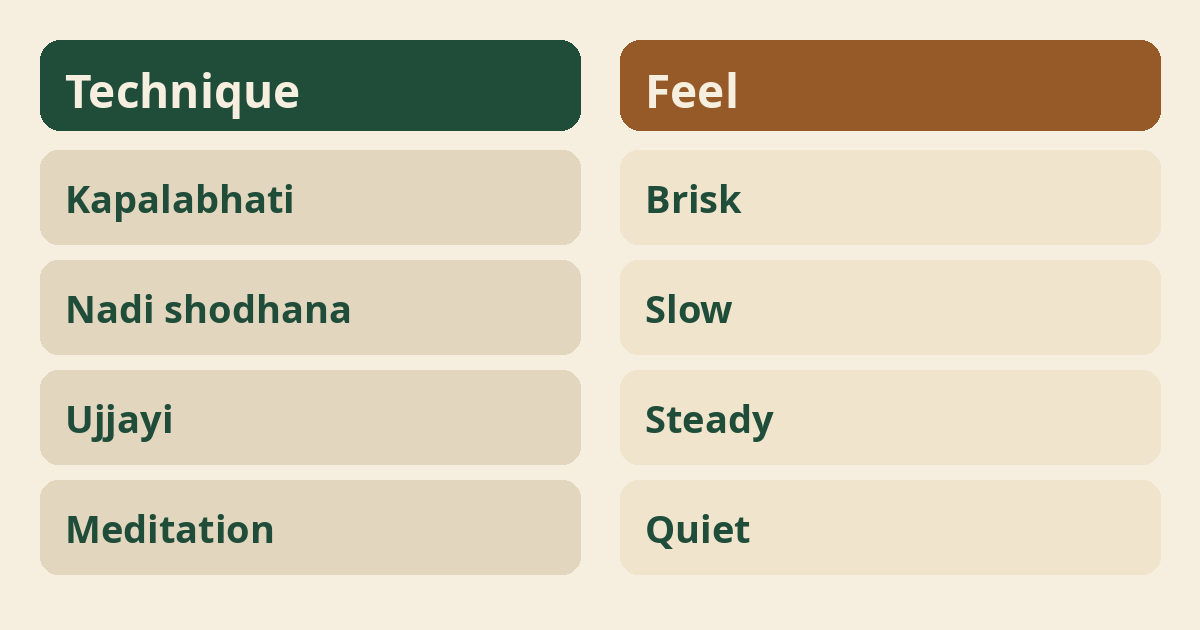
The core beginner techniques are kapalabhati, nadi shodhana, ujjayi, bhastrika, breath holds, mudras, bandhas, and seated meditation. Each one trains breath or attention in a different way. Kapalabhati and bhastrika are brisk and warming. Nadi shodhana and ujjayi are slow and settling. Mudras and bandhas shape how you hold the body while you breathe. Meditation usually closes the session. Our free kriya yoga PDF guides on this site offer printable versions of several of these techniques.
Kapalabhati: skull-shining breath
Kapalabhati is a brisk breathing drill built on short, active exhales. You sit tall and draw the belly inward on each exhale while the inhale happens on its own. Start with twenty or thirty rounds at a slow pace, then rest. The rhythm should stay comfortable, never forced. Skip this one during pregnancy or with high blood pressure or a heart condition, and check with your doctor first if any of those apply. A full how-to follows in the next section.
How to do kapalabhati step by step
Sit tall, relax your shoulders, and begin with short exhales drawn from the belly. Step one, sit in any comfortable cross-legged seat or on a chair. Step two, take two normal breaths to settle. Step three, exhale in short pulses by drawing the navel back, letting the inhale refill on its own. Step four, complete twenty pulses, then breathe normally for half a minute. Step five, repeat for two or three rounds and stop if you feel lightheaded. If floor sitting strains your hips or knees, simple props like a folded blanket can lift the seat and keep the posture kind on your joints.
Nadi shodhana: alternate nostril breathing
Nadi shodhana is a slow breath pattern where you breathe through one nostril at a time. You use the right hand to close the nostrils in turn. The classic beginner pattern is inhale left, exhale right, inhale right, exhale left. That full cycle counts as one round. Four to ten calm rounds is plenty at first. Many beginners like it in the evening because the pace naturally slows the whole body down.
How to do nadi shodhana step by step
Use your right thumb and ring finger to guide the breath from side to side. Step one, sit tall and rest the left hand on the knee. Step two, close the right nostril with the thumb and inhale through the left. Step three, close the left with the ring finger and exhale through the right. Step four, inhale through the right, then switch and exhale through the left. Step five, repeat for six to ten rounds, then lower the hand and breathe normally. Keep every breath quiet and easy rather than deep and strained.
Ujjayi: the ocean breath
Ujjayi is a soft, steady breath made by slightly narrowing the throat. It sounds a little like the sea or a quiet whisper. You breathe in and out through the nose with the same mild resistance on both sides. The sound gives your mind something simple to rest on. Many slow yoga classes use it through the whole session. Beginners often find it the easiest kriya breath to learn first. If the throat feels tight, loosen it, and a plain drill like belly breathing makes a good warm-up before adding the soft throat sound.
Bhastrika: bellows breath
Bhastrika is a stronger breathing drill where both the inhale and the exhale are active. The chest and belly pump like a bellows at an even rhythm. It feels warming and energizing, so most people do it early in the day. Start with ten slow pumps, rest, and build up over weeks. This is one of the stronger kriya techniques, so caution matters. Skip it during pregnancy, with high blood pressure, heart conditions, or after recent surgery, and check with your doctor if any of those apply to you.
Kumbhaka: breath holds
Kumbhaka means pausing the breath, either after the inhale or after the exhale. Beginners start with very short holds of two to five seconds after the inhale. The hold should feel easy, never like a strain or a race. Count slowly and release well before any urge to gasp. Longer holds belong to advanced practice with a teacher. Anyone with heart, blood pressure, or breathing conditions should leave holds out unless their own doctor agrees.
Spinal breathing basics
Spinal breathing links a slow inhale and exhale with attention moving up and down the spine. You sit tall and imagine the breath traveling from the tailbone to the crown as you inhale. On the exhale, attention drifts back down the same path. The breath itself stays natural and unforced. Many kriya lineages treat this as the quiet heart of the practice. It pairs well with the upright alignment taught in mountain pose, where you learn to stack the spine without tension.
Mudras used in kriya
Mudras are hand and finger positions held during breathing and meditation. The two you will meet first are jnana mudra and chin mudra. Both touch the tip of the index finger to the tip of the thumb while the hands rest on the knees. They give the hands a settled place and a light point of focus. Some kriyas add positions at the heart or the brow. Hold them softly, with no squeezing or strain in the fingers.
Bandhas: the energy locks
Bandhas are light muscular holds that redirect the feeling of the breath in the body. The three classic ones are mula bandha at the pelvic floor, uddiyana bandha at the belly, and jalandhara bandha at the throat. Beginners usually meet them as a soft lift or an easy tuck rather than a clench. Learn them one at a time, on easy breaths, before combining. Belly-based locks are done on an empty stomach. Skip strong locks during pregnancy and ask your doctor if you have abdominal or blood pressure concerns.
Kriya warm-up poses
A few slow poses loosen the spine and hips before seated breathwork. Cat-cow is the classic opener because it wakes up the whole spine without strain. You can follow with a side stretch and an easy forward fold. Keep the warm-up short; five minutes is enough. The goal is comfort in the seat, not a workout. Our walkthrough of cat-cow pose shows the breathing rhythm that matches the movement.
A simple 15-minute kriya sequence
A short beginner session can run warm-up, breathing, and meditation in fifteen minutes. Start with three minutes of cat-cow and a seated side stretch. Move to two rounds of kapalabhati, resting between rounds. Follow with six to ten rounds of nadi shodhana. Then sit quietly for five minutes, watching the natural breath. Close in child’s pose or a comfortable seat for one quiet minute. Our beginner’s guide to kriya yoga on this site maps the same arc in more detail for brand-new students.
Mantra in kriya practice
A mantra is a word or sound repeated quietly to anchor the mind. Beginners often use the natural sound of the breath itself as the simplest mantra. Others softly repeat a syllable like om on each exhale. You do not need to believe anything for this to work as a focus tool. The point is giving the mind one job so it wanders less. Keep the repetition light and unforced.
Meditation after kriya
Meditation usually closes a kriya session because the breathwork leaves the mind quiet and ready. Sit tall with the hands resting in a comfortable mudra. Let the breath return to its natural rhythm and simply watch it. When thoughts pull you away, notice and come back without scolding yourself. Five quiet minutes is a real practice. Our site’s kriya meditation post goes deeper into what to do with a busy mind in these minutes.
How to start as a complete beginner
Start with one slow breathing technique and one short meditation, and add more only when those feel easy. Pick ujjayi or nadi shodhana for your first two weeks. Practice at the same time each day so it becomes a habit. Learn the brisk techniques like kapalabhati only after the slow ones feel natural. Read the safety notes before any strong breathing. Our post on practicing kriya yoga at home shows a simple room setup for daily sessions.
A safe first week
In week one, keep every session short, slow, and comfortable. Day one, try five minutes of belly awareness and ujjayi. Day two, add a short cat-cow warm-up. Midweek, try six rounds of nadi shodhana. Later in the week, combine warm-up, one breathing drill, and two minutes of quiet sitting. Stop any drill that brings dizziness, pressure, or strain, and rest.
How long a session should be
Ten to twenty minutes is a solid beginner session. Short daily practice beats one long weekly effort for building the habit. Breathwork tires beginners faster than they expect, so stay on the short side at first. Add a minute or two each week as the practice settles. After a few months, many people sit for thirty minutes or more. Let comfort, not the clock, set the pace.
How often to practice
Daily practice, even ten minutes, is the pattern kriya traditions ask for. The techniques build on repetition, and irregular practice makes each session feel like starting over. If daily is too much, five or six days a week still works well. Our post on how often to practice yoga helps you match the rhythm to your real schedule. Rest days are fine and sometimes needed. What matters most is coming back without drama after a missed day.
Morning or evening
Traditionally kriya is practiced in the early morning, but any quiet time you can keep daily works. Morning practice happens before the day’s noise and on an empty stomach, which suits breathwork. Evening sessions help some people unwind, though strong breathing close to bedtime can feel stimulating for a few. Try both for a week and keep the one you actually repeat. An empty or light stomach matters more than the hour. Consistency beats the perfect time slot.
Props that help
A firm cushion or folded blanket under the seat is the one prop most kriya beginners need. Raising the hips above the knees lets the spine stay tall without effort. A chair works just as well if floor sitting is uncomfortable. Keep a light blanket nearby in case you cool down during meditation. Blocks and straps are optional here since the practice is mostly seated. If your hips feel tight in a cross-legged seat, butterfly pose is a kind opener to practice on other days.
Breathing mistakes beginners make
The most common mistake is breathing too hard and too fast in the brisk techniques. New students often turn kapalabhati into a panting race, which brings dizziness and strain. Another mistake is holding the breath longer than feels easy. Shrugging the shoulders while breathing is a third. The fix for all three is the same: slow down, soften, and shorten the session. Comfort is the true measure of good technique here.
Common technique mistakes
Doing too many techniques in one session is the classic beginner error. Kriya works through repetition of a few practices, not sampling many. Jumping between sequences every few days stalls progress. Another mistake is skipping the quiet sitting at the end, which is where the practice settles. Practicing strong breathwork on a full stomach also causes discomfort. Pick one sequence, keep it small, and stay with it for weeks before changing anything.
Who should be careful
Anyone pregnant, or living with high blood pressure, heart disease, glaucoma, epilepsy, or recent surgery, should talk with a doctor before strong breathwork. The brisk breathing drills and breath holds change pressure in the chest and head. That is why the caution list is longer than for slow stretching. If you have a back condition, seated posture matters too, and our post on practicing with a bad back covers comfortable options. Pregnant readers can look at how prenatal yoga differs from regular practice to see what changes and why. When in doubt, show your doctor the exact techniques you plan to try.
Is kriya yoga a treatment
Kriya yoga is not a treatment, cure, or therapy for any medical or mental health condition. It is a traditional self-development practice, and it should sit alongside proper medical care, never in place of it. If you live with a health condition, your doctor’s guidance comes first. Breathing drills can also interact with some conditions in ways that matter. Use the practice as a complement to a healthy life, and keep your care team in the loop.
Benefits people report
Many people find that regular kriya practice leaves them calmer, more focused, and more settled in daily life, though results vary from person to person. Students often describe easier breathing, a quieter mind at night, and more patience in stressful moments. Some notice better posture and body awareness from the daily sitting. Research on yogic breathing is still developing, and organizations like National Center for Complementary and Integrative Health publish balanced summaries of what studies suggest so far. Nothing here is guaranteed, and your experience will be your own. For days when stress is the main visitor, our post on yoga for stress relief pairs well with this practice.
How progression works
Progress in kriya means steadier breath, longer comfortable sits, and fewer distractions, not harder tricks. A common path is slow breathing for a month, then adding kapalabhati, then short breath holds, then longer meditation. Each stage takes weeks, not days. Teachers often judge readiness by how relaxed you stay, not by counts or minutes. Rushing tends to bring the same strain mistakes listed above. If you also enjoy the physical side of yoga, steady work in flexibility basics and simple balance practice supports the long seated holds.
Do you need a teacher
You can learn the basic breathing drills alone, but a qualified teacher matters for the stronger techniques. Breath holds, strong bhastrika, and bandha combinations carry real cautions. A teacher watches your strain signals and corrects your pace. Many traditions also pass the full kriya sequence only in person. Articles like this one can carry you through the early steps safely. Look for a teacher with long training in a recognized kriya lineage.
Kriya yoga and other styles
Kriya yoga focuses on breath and meditation, while styles like hatha focus more on physical postures. The two fit together well: hatha builds the strong, open body that makes long sitting comfortable. Restorative styles help on tired days when breathwork feels like too much. Kriya is also the name of a specific lineage of teachings, so you may see the word used both ways. Nothing in one style cancels the other. Most long-term students blend a physical practice with a seated kriya routine.
Mindset that keeps practice going
Treat each session as showing up, not achieving. Some days the mind is loud and the breath feels rough, and that is normal weather, not failure. The benefits people describe come from months of ordinary sessions. Comparing your progress to others only adds noise. A small notebook of session notes keeps motivation honest. Kindness toward your own pace is part of the technique.
Practicing kriya at home
A quiet corner, a firm seat, and a fixed time are all a home kriya practice needs. You do not need a special room or equipment beyond a cushion. Keep the phone outside arm’s reach for the session. Short seated stretches like neck and shoulder release help if you sit at a desk all day, and desk yoga movements can loosen you up before you sit. Our kriya poses post covers seated alternatives if cross-legged is hard on your knees. Home practice works best when the setup takes under a minute.
Seated poses used in kriya
Any steady, upright seat you can hold for ten minutes works for kriya. Easy cross-legged, thunderbolt, and half-lotus are the common choices. Kneeling seats like thunderbolt pose keep the spine tall and suit people with tight hips. Garland pose and hip-opening practice on other days can make floor sitting easier over time. A chair with both feet flat is a fully valid seat. Steady and easy beats impressive every time.
When to pause or stop
Stop any practice that brings dizziness, chest pressure, pain, or unusual agitation, and rest. These signals usually mean the pace was too strong for that day. Return to natural breathing and sit or lie quietly until you feel normal. If symptoms repeat across sessions, drop that technique and speak with your doctor. Practice should leave you steadier afterward, not wrung out. On recovery days, a resting shape like puppy pose keeps the habit alive without strain.
Where to read next
For a calm, beginner-friendly start, Ranjana Sinha’s Begin Where You Are is written for people who want simple steps. Our guide to starting a home yoga practice adds a gentle routine you can follow at home.
Frequently asked questions
Is kriya yoga suitable for someone who has never done yoga?
Yes, the slow breathing drills and short meditation steps are beginner-friendly as long as you follow the safety notes.
Do I have to sit cross-legged on the floor?
No, a chair with both feet flat on the ground is a fully valid kriya seat.
What should I do if breathwork makes me lightheaded?
Stop, return to normal breathing, rest until you feel steady, and shorten or soften the drill next time.
Can I practice kriya techniques alongside my current yoga classes?
Yes, kriya breathwork and meditation pair naturally with any posture practice.
How soon will I notice changes from daily practice?
It varies widely; many people report small shifts in calm and focus within a few weeks of steady sessions.
The bottom line
Start small, stay comfortable, and let a few minutes of daily practice grow in its own time.