Yoga for runners’ hips is a gentle way to explore comfortable hip movement alongside running, without forcing deep stretches. Start with supported positions, easy breathing, and a short session that leaves you feeling settled rather than strained. You do not need to sit cross-legged or touch your toes to begin. This guide explains a small practice you can adapt to your body, your running schedule, and your space. If pain or an injury brought you here, speak with your doctor before trying it.
This guide offers general education, not medical advice or an individual exercise plan. Check with your doctor before starting if you have pain, an injury, a recent operation, pregnancy, or a condition that affects safe movement.
What is yoga for runners’ hips?
It is a gentle yoga practice that explores hip movement in several comfortable positions. Rather than targeting one supposed tight spot, you move slowly and notice how each side feels. A beginner practice may include supported rest, small movements on hands and knees, and a mild stretch that you can leave easily.
Why do runners try it?
Runners often try hip-focused yoga to add slower movement to their exercise routine. Running and yoga have different rhythms, so this quiet practice can offer a welcome change of pace. You might enjoy noticing your breathing and posture without tracking distance, speed, or how far another person can stretch.
What benefits are realistic?
Many people find gentle yoga useful for body awareness, relaxation, and exploring comfortable flexibility, but results vary. It is reasonable to look for a pleasant practice rather than a promised change in running performance. Read broader yoga safety and evidence information at National Center for Complementary and Integrative Health, and remember that general benefits do not establish a result for your hips.
Is this a treatment?
No, this routine is not a treatment for hip pain or a running injury. Pain can have different causes, and a stretch that feels right to one person may be wrong for another. If symptoms interrupt walking, running, or sleep, ask your doctor about assessment rather than using this sequence to test them repeatedly.
Who should be careful?
Ask your doctor first if you have persistent hip pain, a diagnosed joint condition, recent surgery, or an injury. Pregnancy, balance difficulties, and restrictions from a health professional also call for individual guidance. Do not assume that a pose is suitable because it is called gentle, and keep any existing movement restrictions in place.
What symptoms mean stop?
Stop if you notice sharp pain, pinching, numbness, tingling, dizziness, or a feeling that the joint is giving way. Come out slowly and choose a comfortable resting position rather than pushing through. Seek medical advice for symptoms that continue or return; severe pain after a fall or inability to bear weight needs prompt medical care.
How should you start?
Begin on a day when ordinary walking feels comfortable and you are not trying to stretch away pain. Clear enough floor space to move without bumping furniture, and place your props within reach. Start with one or two movements before trying the full sequence, so you can learn how your body responds without stacking several unfamiliar positions.
What props help?
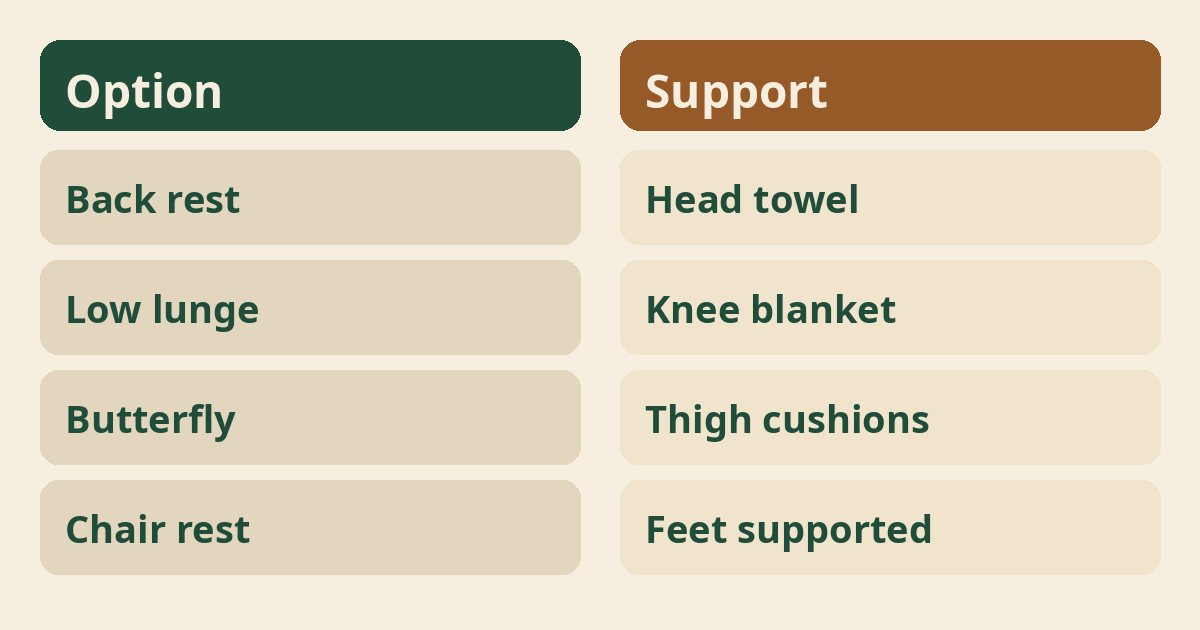
A firm cushion, folded blanket, and stable chair can make the practice easier to adjust. Use props to reduce effort, not to push your body into a larger range. Keep a chair against a wall if it could slide, and see beginner yoga props for more ways to support a comfortable setup.
Step 1: Settle on your back
Start lying on your back with your knees bent and feet resting on the floor. Use a small folded towel under your head if that feels more comfortable, and let your arms rest beside you. Notice the contact of your feet and back without flattening your spine by force or pulling your knees toward your chest.
Step 2: Make small knee movements
Let both bent knees move a little to one side, return to the middle, and then try the other side. Keep the movement small enough that you can breathe easily and return without effort. Your knees do not need to reach the floor, and any pinching is a reason to stop rather than widen the movement.
Step 3: Try a supported figure four
Cross one ankle over the opposite thigh only if the position feels comfortable at your hip and knee. Keep the supporting foot on the floor, and do not press the crossed knee downward. If crossing the ankle causes discomfort or requires pulling hard, leave both feet down and repeat the small knee movements instead.
Step 4: Explore a low lunge
From hands and knees, bring one foot forward and keep your back knee supported on a folded blanket. Place your hands on stable supports and remain fairly upright, with only a small forward shift if comfortable. Avoid sinking deeply or arching your lower back; skip this step if kneeling or getting into position is uncomfortable.
Step 5: Choose a supported butterfly
Sit on a firm cushion, bring the soles of your feet together, and support your thighs if needed. Keep your feet farther from your body when that makes the position easier, and stay upright rather than folding forward. There is no need to bounce your knees; butterfly pose basics offers another beginner reference.
Step 6: Finish with quiet rest
End on your back with bent knees or sit comfortably in your stable chair. Let the practice settle for a few easy breaths before standing, and move slowly when you get up. A calm finish gives you a chance to notice your response without immediately testing the hips with a deep squat or another stretch.
How should you breathe?
Breathe normally and let the breath stay easy throughout each movement. You can gently lengthen an exhale if it feels natural, but avoid breath-holding or forcing a large inhale. If attention to breathing makes you tense, return to your usual rhythm; gentle breathing basics can help you explore without pressure.
How long should a session last?
A first session can be about five to ten minutes, with fewer movements if that suits you better. This is a starting option, not a required dose or a promise of results. Spend only a few comfortable breaths in a still position, and leave sooner if keeping the shape begins to feel tiring or strained.
How often should you practice?
Start with a couple of short sessions a week and adjust according to comfort and recovery. You do not need a daily streak to make yoga part of your running routine. Leave room to notice any later soreness, and use choosing your yoga frequency as a starting point rather than a rule you must obey.
Should you practice before running?
Before a run, keep any yoga brief and gentle rather than choosing long or intense stretches. This routine is not a replacement for your usual running warm-up or advice from a coach. If a pose leaves your legs tired or changes how comfortably you move, save that pose for another time instead of running straight afterward.
Should you practice after running?
After running, wait until your breathing settles before trying a short, comfortable practice. Walk gently and take care of your usual recovery needs first, without rushing to reach a stretch. If the run left your hip painful or your legs too tired to control the movements, skip the sequence rather than treating yoga as compulsory.
Can you practice on rest days?
A rest day can be a useful time to explore a small sequence without adding much effort. Keep the session restful enough that it does not become another demanding workout. You can choose breathing and supported rest alone, especially when your training has already felt hard or your body seems less comfortable than usual.
How strong should a stretch feel?
Choose a mild sensation that stays comfortable, rather than chasing the strongest stretch you can tolerate. You should be able to breathe, soften unnecessary effort, and leave the position without a struggle. Pain, joint pinching, and a need to brace are not goals; reduce the range or choose a different movement when they appear.
What are common mistakes?
Common mistakes include forcing range, copying a deeper pose, and rushing between positions. A photo cannot tell you what your own joint should do, and a wider position is not automatically better. Give yourself time to enter and leave each movement, especially when you are tired after running or still learning the setup.
What if one side feels different?
Use a smaller comfortable range on each side rather than trying to make the two sides match. Differences in sensation are something to notice, not a reason to press harder on the less mobile side. New, painful, or growing differences deserve medical advice, particularly if they also show up during walking or running.
What if your knees dislike a pose?
Leave any pose that causes knee discomfort instead of trying to tolerate it for a hip stretch. A blanket may make floor contact more comfortable, but it does not make every joint position suitable. Try the chair or simple lying rest instead, and ask your doctor about pain that continues outside the practice.
What if your back feels strained?
Reduce the range or stop the movement if your lower back feels strained. In a lunge, staying upright and making a smaller shift may feel easier than leaning forward or arching. If you already have back symptoms, get individual guidance first; yoga and back concerns discusses questions worth considering before practice.
Do you need pigeon pose?
No, a beginner runner does not need pigeon pose to have a worthwhile hip-focused practice. A deep floor position may be awkward to enter and can feel uncomfortable at the knee or hip. Start with options you can control, and do not use a difficult pose as proof that you are serious about your running.
Can tight hips mean weakness?
A feeling of tightness alone cannot tell you whether your hips need stretching, strength work, rest, or assessment. Avoid diagnosing yourself from one sensation or a social media checklist. A qualified professional can help you choose suitable work when needed, while this yoga practice remains a modest option for comfortable movement rather than a complete training plan.
Does yoga replace strength training?
Gentle hip yoga does not replace a suitable strength program or your running plan. Stretching practice and strength work ask different things of your body, so do not judge one as a substitute for the other. If you want help combining them, discuss your goals and any symptoms with a qualified coach or health professional.
How should you progress?
Progress by making the familiar sequence easier to control before adding more time or range. You might use a little less support only when the position still feels relaxed and steady. Change one thing at a time, and keep the gentler version available; beginner hip yoga offers broader options to explore gradually.
When should you find a teacher?
Find a qualified yoga teacher when you want help with setup, support, or choosing accessible alternatives. Explain that you run, describe your experience, and share any movement limits your doctor has given you. A teacher should welcome smaller ranges and skipped poses rather than asking you to endure pain or promising to fix an injury.
What mindset works best?
Treat the practice as an observation of your body, not a competition with your pace or flexibility. Some days the same movement will feel easier, and other days you may choose rest. A short session that respects your limits is still a complete practice, even when it looks less impressive than the routine you had planned.
What if you cannot sit on the floor?
You can keep the practice chair-based or use comfortable lying positions without sitting on the floor. Choose a stable chair and begin with feet supported, small movements, and easy breathing. If getting down or standing up feels unsafe, leave floor work out; chair-friendly yoga ideas can offer a simpler starting point.
How can you judge your response?
Judge the session by comfort during practice and how ordinary movement feels afterward, not by stretching depth. Notice later that day and the next day whether walking and daily tasks feel normal for you. If discomfort increases or keeps returning, pause the routine and speak with your doctor instead of adding more stretches to solve it.
What is a simple weekly plan?
Try two short sessions away from your hardest runs, while keeping the plan flexible. Choose one settling movement, one comfortable stretch, and quiet rest rather than using every pose each time. If your training load changes, make yoga smaller too; a routine should fit your recovery and available energy rather than become another deadline.
Where to read next
For a calm, beginner-friendly start, Ranjana Sinha’s Begin Where You Are is written for people who want simple steps. Our guide to starting a home yoga practice adds a gentle routine you can follow at home.
Frequently asked questions
Do runners need flexible hips?
Runners do not need to reach an extreme yoga position, and comfortable movement matters more than a particular flexibility goal.
Can I do this with hip pain?
Ask your doctor first and do not use this sequence to stretch through unexplained or persistent hip pain.
Should I hold both sides equally?
Use comfortable holds on each side without forcing equal range or staying longer in a painful position.
Will this make me run faster?
This gentle routine makes no promise about speed, and any effect on your running experience will vary.
Can I skip the lunge?
Yes, leave out the lunge if kneeling or the position is uncomfortable and choose supported rest instead.
The bottom line
Let yoga sit alongside your running as a small, comfortable practice, and ask for medical guidance whenever pain or an injury changes what feels safe.