Moon salutation is a yoga sequence that links several poses into a flowing practice, often with side bends and wide standing positions. You do not need moonlight, a deep squat, or a long routine to begin. Start with a short version, move within a comfortable range, and learn each position before joining them together. This guide uses a simple standing variation rather than claiming one fixed sequence. The aim is to make the movement understandable, not to reach a particular shape.
This article offers general yoga education and is not medical advice. Check with your doctor before starting if you have a health condition, an injury, recent surgery, pregnancy, or concerns about whether these movements are suitable for you.
What is moon salutation?
Moon salutation is a linked yoga practice commonly called Chandra Namaskar. Different teachers arrange its poses in different ways, so the name does not identify one universal routine. Many versions use side-to-side movements, wide stances, and a slower rhythm. Ask which variation a class teaches rather than expecting every moon salutation to match this guide.
Why do people practice it?
People often choose moon salutation for a quieter style of movement. Its changes in direction can offer a different experience from a forward-moving sun salutation. You might enjoy the chance to pause between positions and notice your breathing. That preference is personal, and a slow sequence is not automatically easy for every body.
Is it different from sun salutation?
Moon salutation and sun salutation are different sequence families, not opposing medical methods. Sun salutations often include forward folds and stepping or jumping movements, while many moon variations emphasize sideways travel. Neither name tells you exactly how demanding a class will be. Choose by the actual poses and pace rather than by the title alone.
How do you start?
Begin by learning the poses separately before trying to flow between them. Clear a space wide enough for your arms and a wide stance, with a stable surface underfoot. Try a few small shoulder movements and easy weight shifts first. Practice mountain pose so you have a familiar position to return to whenever you need a break.
Step 1: Stand and settle
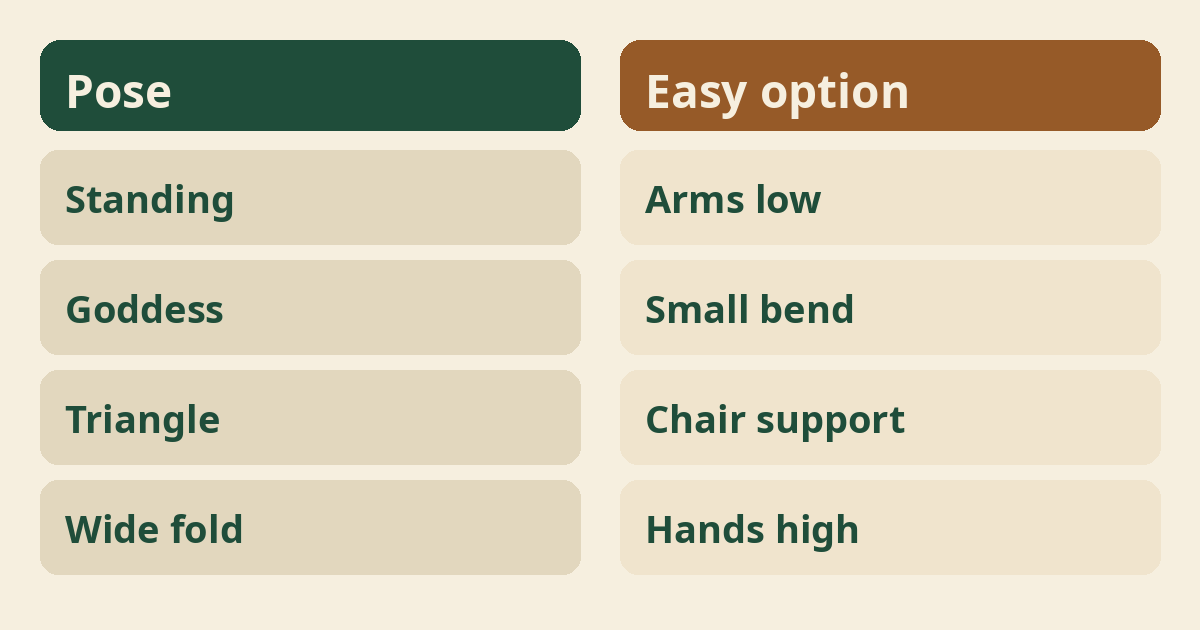
Start in a comfortable standing position with your arms resting by your sides. Keep your feet at a width that feels steady instead of forcing them together. Look forward, let your shoulders settle, and take a few ordinary breaths. If you raise your arms, lift only as far as your shoulders comfortably allow.
Step 2: Add small side bends
Make a gentle side bend in each direction without turning it into a deep stretch. Keep both feet grounded and allow your arms to stay low if overhead reaching feels awkward. Return to upright between sides rather than sweeping quickly across. Think of lengthening through your side, with no need to press your hips far out.
Step 3: Take a wide stance
Step your feet wider only as far as you can stay steady. Turn your toes outward a little if you plan to bend your knees, adjusting the angle to suit your hips. Place your hands on your waist or keep your arms low. You can skip the knee bend entirely and use this wide standing position instead.
Step 4: Try a shallow goddess pose
Bend your knees slightly into a shallow goddess pose if it feels comfortable. Let your knees move in the same general direction as your toes without forcing either outward. Keep your chest upright and your weight spread through your feet. Straighten your legs again to reach an easy star shape, with your arms at a comfortable height.
Step 5: Make a supported triangle shape
Try a small triangle shape on one side with your lower hand supported. Turn your leading foot toward that side and adjust the other foot so you feel stable. Keep both legs long without locking your knees, then reach sideways and rest your hand on a block or sturdy chair. Return upright before changing your foot position for the other side.
Step 6: Fold lightly and return
Finish with a shallow wide-leg fold, then return slowly to your starting stance. Put your hands on a secure chair seat or another suitable support and bend from your hips with soft knees. Keep your head level with or above your heart if lowering it is not appropriate for you. Rise gradually, bring your feet closer in controlled steps, and pause before repeating.
How do you join the steps?
Link the poses only after each individual movement feels familiar. Move from standing into small side bends, then the wide stance, shallow goddess, star, supported triangle on each side, and supported fold. Pause upright when changing the direction of your feet. This is a beginner variation, so you may leave out any pose rather than trying to complete a fixed pattern.
How should you breathe?
Keep your breathing comfortable instead of forcing each movement into one breath. You can breathe in while returning upright and breathe out while bending, but that is a useful cue rather than a strict rule. Take extra breaths whenever a transition needs more time. For a separate introduction to relaxed breathing, see belly breathing for beginners.
How long should a session be?
A first session can be just one slow pass through the sequence. Spend enough time in each position to check your footing and comfort before moving again. You can practice for a few minutes without aiming for a long workout. Stop while your movements still feel controlled, rather than adding rounds simply to reach a time target.
How often should you practice?
Choose a frequency that leaves you comfortable during practice and afterward. Start with occasional short sessions and notice how you feel later that day and the next morning. There is no required daily schedule for this sequence. The guide to how often to do yoga can help you think about a routine that fits your life.
What mistakes are common?
Rushing between poses and copying a deep demonstration are common beginner mistakes. A wide stance that looks impressive may make your own balance less steady. Holding your breath can also make a simple transition feel strained. Reduce the range, pause upright, and let the practice look smaller than the version you saw in a class or video.
Which props are useful?
A sturdy chair and suitable blocks can make the standing positions easier to adjust. Check that the chair cannot slide or tip, and avoid light furniture that moves under your hand. Choose a support height that lets you reach without straining. Read yoga props for beginners for ideas, but remember that equipment does not make every pose suitable.
What if balance is difficult?
Use a nearby support and smaller steps when balance feels uncertain. Keep your gaze on a steady point and avoid turning your head abruptly while changing position. You can work on one pose at a time without linking the whole sequence. If balance problems are new or unexplained, ask your doctor before practicing; yoga for balance is general guidance, not an assessment.
What if your hips feel tight?
Reduce the width of your stance instead of pushing your hips into a larger shape. Tightness is not a reason to force your knees farther apart or lower your squat. Try a small knee bend, or leave the legs straight while you learn the transitions. A comfortable position may look different on each side, and you do not need to make both sides identical.
What if your knees feel uncomfortable?
Stop a knee bend that causes pain rather than trying to stretch through it. Return to an easy standing position and leave goddess pose out of the sequence. A narrower stance or smaller bend may feel different, but do not keep testing a painful movement. Ask your doctor about persistent knee symptoms before returning, then seek suitable adjustments from a qualified teacher.
What if your back is sensitive?
Check with your doctor first if you have a back condition or recurring back pain. A forward fold and a side bend may need different adjustments, even within the same routine. Keep support high and movements small only if they fit the guidance you have been given. The article can you do yoga with a bad back explains why a general sequence cannot answer an individual safety question.
Who should be careful?
Anyone with an injury, recent surgery, dizziness, or a relevant health condition should ask their doctor first. Mention the actual movements, including wide stances, knee bends, and folds, rather than asking only about yoga in general. Tell your teacher about any limits your doctor gives you. Do not assume a moon-themed or gentle class is suitable without checking its content.
Is it suitable during pregnancy?
Ask your maternity care team before starting, and choose a teacher trained in prenatal yoga. Pregnancy can change the support and stance that feel appropriate, so a general moon salutation is not a prenatal plan. Avoid using this article to decide which poses you should keep. Read prenatal yoga versus regular yoga to understand why a pregnancy-specific class may be a better starting point.
Is this a treatment?
Moon salutation is a movement practice, not a treatment for a medical condition. It should not replace prescribed care, an assessment, or advice about pain and other symptoms. Avoid promises that a particular sequence will balance hormones or fix sleep problems. If you are seeking help for a health concern, speak with your doctor before choosing yoga as part of your routine.
What benefits might you notice?
Many people find a slow yoga sequence enjoyable and calming, but results vary. You may appreciate the chance to move, practice coordination, and give your attention to one task. Benefits reported for yoga broadly do not establish special effects for moon salutation itself. See National Center for Complementary and Integrative Health for general yoga information, and judge this sequence by your comfort and experience rather than a promised outcome.
What does the moon symbolism mean?
The moon theme is a teaching image, not a rule about how your body works. Some teachers use it to suggest a quieter mood or a softer pace. You can enjoy that image without believing it changes your hormones, energy, or health in a measurable way. If the symbolism does not appeal to you, focus on the movements and ordinary breathing.
Must you practice at night?
You can practice moon salutation whenever the timing suits you. There is no need to wait for darkness or a particular phase of the moon. Choose a time when you have space to move without hurrying and can notice how you feel. If evening practice feels too active, make it shorter or choose a different time.
Can you practice without a mat?
A mat is optional if your surface and footing are stable. Avoid slippery socks, loose rugs, and uneven ground, especially during wide stances and sideways transitions. A mat that bunches or slides is not helpful simply because it is a yoga mat. Check the surface before beginning and make sure any chair support is stable on that same floor.
Can you use a chair version?
A chair can support standing poses, but a fully seated routine needs its own instructions. Do not assume every standing shape can be copied safely while sitting. If standing is unsuitable, ask a teacher for a seated sequence that fits your needs. The guide to yoga at your desk offers a separate starting point rather than an exact seated moon salutation.
How do you progress?
Progress by improving control before adding range or extra rounds. Notice whether you can change your footing slowly, keep breathing, and return upright without rushing. When those parts feel familiar, you might reduce your reliance on support if it is appropriate. Deeper squats and lower folds are optional, not milestones that prove your practice is better.
When is a teacher useful?
A qualified teacher is useful when you are unsure about stance, transitions, or adjustments. Ask them to demonstrate a beginner variation and watch how you move through it. Mention any symptoms or medical limits before the lesson starts. A good lesson should help you understand your options without pressuring you to follow the deepest version of a pose.
What mindset helps?
Treat the sequence as a practice in paying attention rather than a performance. Some days a short, supported version may suit you better than a flowing round. Notice the urge to compare your shape with a photograph and return to what feels steady. The useful question is whether you can move comfortably, not whether you look like someone else.
How should you finish?
Finish by returning to a steady position and allowing a quiet pause. Rest your arms and let your breathing return to its usual rhythm without adding a special breathing exercise. You may prefer to sit on a chair rather than move to the floor. If it suits your body, child’s pose is another option, but it is not required.
What signals mean you should stop?
Stop if you feel sharp pain, dizziness, unusual breathlessness, or a sense that you may faint. Move to a safe resting position instead of finishing the round. Seek medical help for concerning, severe, or persistent symptoms rather than interpreting them as part of yoga. Mild effort and a comfortable stretch are different from symptoms that make you feel unwell or unsafe.
Where to read next
For a calm, beginner-friendly start, Ranjana Sinha’s Begin Where You Are is written for people who want simple steps. Our guide to starting a home yoga practice adds a gentle routine you can follow at home.
Frequently asked questions
What is the Sanskrit name for moon salutation?
Moon salutation is commonly called Chandra Namaskar, though teachers use different sequences under that name.
Can a complete beginner try it?
A beginner can start with a small, supported variation after checking any relevant health concerns with a doctor.
Do I need a deep squat?
No, you can use a shallow knee bend or leave the squat out entirely.
Should I move once per breath?
No, take extra breaths whenever you need more time to stay steady and comfortable.
Do I need to follow a moon phase?
No, you can choose a practice time based on your schedule and comfort.
The bottom line
Begin with one small, steady round and let comfortable movement, rather than a perfect shape, guide your next practice.