Revolved triangle is a standing yoga pose that combines a forward fold with a gentle turn of the chest toward the front leg. For beginners, the useful starting point is a short stance, a raised hand support, and a small twist rather than a hand reaching the floor. You can keep the upper hand on your hip and look down while learning. This guide explains how to explore the shape without forcing your back, knees, or neck, and when to choose something simpler.
This guide offers general education, not medical advice or an individual exercise prescription. Check with your doctor before trying the pose if you have a health condition, an injury, recent surgery, or concerns about whether twisting is appropriate for you.
What is revolved triangle?
Revolved triangle is a standing forward fold with a turn through the chest. In its usual shape, the opposite hand supports you near the front foot while the other hand rests on the hip or reaches upward. A beginner version keeps the lower hand high and the turn modest, making the starting position easier to adjust.
What does the name mean?
The Sanskrit name often used for this pose is Parivrtta Trikonasana. You may hear a teacher call it twisted triangle or revolved triangle. The name describes the shape rather than a required depth, so you do not need a large rotation or perfectly straight legs to explore an appropriate version.
Why do people practice it?
People practice this pose to explore balance, a long spine, and a controlled turn. Holding a steady base while changing the direction of the chest can require careful attention. Some people enjoy that challenge, while others prefer a simpler standing pose, and neither choice says anything about how good they are at yoga.
Is it a beginner pose?
Revolved triangle can be demanding, so beginners should start with plenty of support. A short stance and a high block are useful starting choices, but they do not make the pose suitable for everyone. If the setup feels confusing or unstable, work with a teacher or choose a standing position without the twist.
How should you prepare?
Begin with easy movements before adding a standing twist. Walk gently, move your shoulders, and practice a comfortable hip hinge with your hands on your hips. If moving on hands and knees suits you, cat-cow pose offers another way to notice your back moving without demanding this standing shape.
Step 1: Build your stance
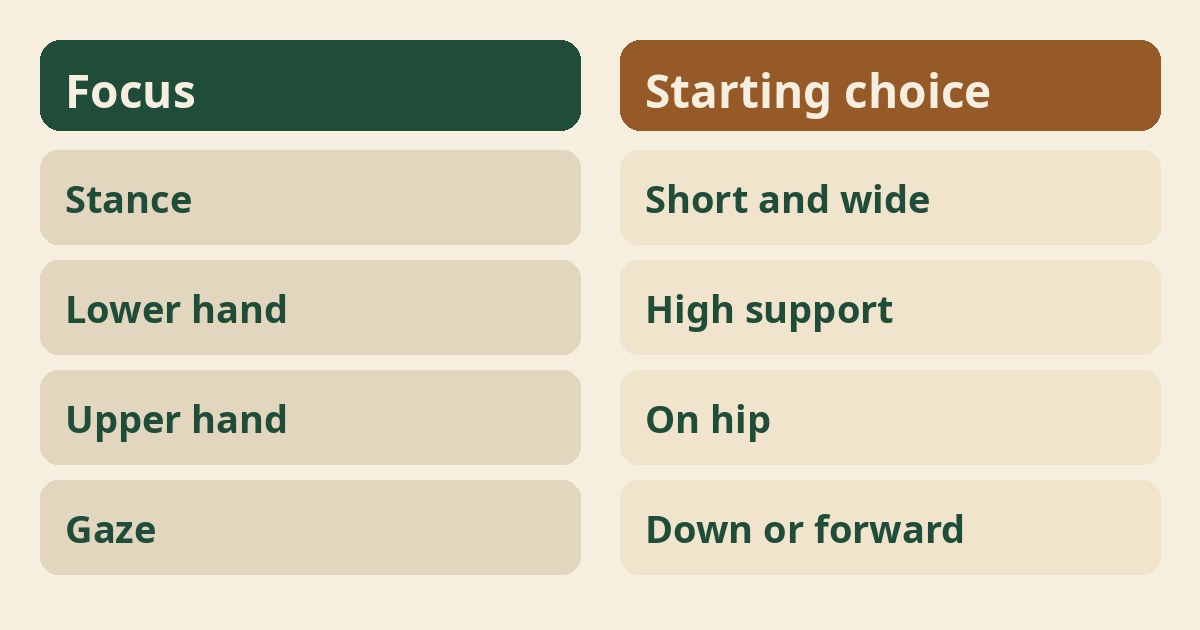
Start with your right foot forward and your left foot behind in a short, wide stance. Keep the feet on separate tracks rather than placing them along one narrow line. Turn the back foot slightly outward as needed, then adjust until both feet feel grounded without pulling at either knee or making you sway.
Step 2: Find a steady base
Let your pelvis face generally forward without forcing the hips into an exact position. Keep both knees soft while you settle your weight across the feet. A slight bend in the front knee is fine, especially if straightening it makes your back round or your balance uncertain before you have started the twist.
Step 3: Lengthen and hinge
Place your hands on your hips and tip forward from the hip creases. Keep the chest reaching forward rather than dropping toward the knee. Stop at a height where your back feels comfortable; you can remain quite upright, and a shorter forward fold is often a better starting point than chasing a deeper stretch.
Step 4: Place the lower hand
Rest your left hand on a high block beside the inside of your right foot. Set the block in a stable position before putting weight on it. The hand can stay well forward of the foot if that gives your chest more room, and a firm chair offers a higher support when a block is too low.
Step 5: Add a small turn
Keep your right hand on your hip and gently turn your chest toward the right. Move only as far as you can without squeezing your belly or pulling the lower back. Your pelvis does not have to stay perfectly still, and your shoulders do not need to form a vertical line for this version to count.
Step 6: Return and switch
Unwind the chest before lifting your torso and changing sides. Bend the front knee a little, use your support, and come upright slowly with your hands on your hips. Pause before moving the left foot forward, then repeat the same gentle sequence rather than expecting both sides to look or feel identical.
Where should you look?
Looking down or slightly forward is a sensible starting choice. Turning the head upward adds another demand and is optional. Keep your neck in a comfortable line with the rest of your spine; if your neck feels pinched or your balance changes when you look up, return your gaze toward the floor.
Must the upper arm lift?
The upper hand can stay on your hip throughout the pose. Raising the arm is an option, not a sign that the pose is complete. If you choose to reach upward, keep the shoulder comfortable and the chest easy; lower the hand again if reaching causes strain or pulls you further than intended.
How should you breathe?
Breathe normally and use an easy exhale to settle into a small turn. You do not need to hold your breath, force a long exhale, or pull your belly inward. If breathing becomes tight, reduce the fold or come out; belly breathing is a separate practice to explore in a relaxed resting position.
How long should you stay?
Start with one or two comfortable breaths rather than a long hold. Leave while you still feel steady and able to return smoothly. A longer stay is not automatically more useful, especially while you are learning where to place the feet, and you can practice entering and leaving without holding the final shape.
How often can you practice?
Let comfort, recovery, and your wider yoga routine guide how often you try it. There is no need to repeat a demanding twist every day or add it to every session. The ideas in how often to do yoga can help you think about a routine without treating any single pose as essential.
Which props help?
A block, a firm chair, or a wall can make the setup easier to manage. Choose support that stays put and lets your lower hand reach without collapsing your chest. Avoid slippery furniture and loose stacks of books; yoga props for beginners explains how to think about height, stability, and comfort when choosing simple equipment.
How can a chair version work?
A firm chair can raise the lower hand well above floor level. Place a non-wheeled chair where it cannot slide, with its back against a wall if suitable, and test it before leaning on it. Hinge only a little and turn gently with the upper hand on your hip; stop if the chair or your feet move.
Can a wall help balance?
A wall can offer a reference point when standing balance feels uncertain. A teacher can help you position yourself so your hip or hand has light support without wedging your body into the twist. For easier balance work first, explore yoga for balance and keep the challenge small enough to manage calmly.
What is the biggest mistake?
The biggest mistake is reaching lower by rounding and forcing the twist. Moving the hand to the floor can make the shape look deeper while leaving less room for comfortable movement. Raise the support, shorten the stance, and ease the rotation instead of using your lower arm to pull yourself around.
What about the knees?
Avoid locking a knee or pushing through knee pain. Keep a small bend if that makes the position easier, and adjust the back foot rather than making the knee absorb an awkward angle. Pain is a reason to leave, not a cue to hold longer or press harder into the floor.
Should the hips be perfectly square?
A generally forward-facing pelvis is a starting idea, not a rigid rule. Forcing both hip points into an exact line can make a comfortable stance feel cramped. Allow a small natural adjustment while keeping the feet steady, and ask a teacher for help if you cannot turn without pulling at the back or hips.
Who should be careful?
Ask your doctor first if you have an injury, recent surgery, or a health condition that affects safe exercise. This matters particularly when bending, twisting, or balancing has been restricted or causes symptoms. Medical guidance comes before pose advice, and a yoga teacher can then help adapt a practice within the limits your clinician gives you.
Can you do it with back pain?
Check with your doctor before using this pose when you have back pain. Do not assume a twisting stretch is helpful simply because it feels tight, and do not use the pose to test an unresolved problem. yoga with a bad back can support a cautious conversation, but it cannot decide what is safe for your situation.
What about pregnancy?
During pregnancy, ask your maternity clinician before trying this forward-folding twist. Avoid squeezing the abdomen into the standard shape or following a general class without suitable guidance. A qualified prenatal teacher can help choose other options after clinical clearance; prenatal and regular yoga explains why the practice may need a different approach.
When should you stop?
Stop if you feel sharp pain, dizziness, numbness, tingling, or trouble breathing. Unwind gently and use your support to return upright, then rest somewhere steady. Do not keep repeating the movement to see whether a symptom disappears; seek medical advice for symptoms that persist, recur, or cause concern, and urgent help for severe symptoms.
Is this a treatment?
No, revolved triangle is not a treatment for back pain or any medical condition. It is an optional movement within a yoga practice, not a substitute for assessment or prescribed care. A feeling of stretching does not show that an injury is improving, and no particular alignment can promise a health result.
What benefits might people notice?
Many people find that supported practice helps them notice balance, body position, and comfortable movement; results vary. Any change depends on the person and the wider practice, not this pose alone. General information about yoga and safety is available through National Center for Complementary and Integrative Health, but it does not mean revolved triangle offers a specific result for every beginner.
How do you progress?
Progress by making the setup calmer before making the pose deeper. Look for steady feet, easy breathing, and a smooth exit across several comfortable attempts. Change only one thing at a time, such as slightly lowering the support, and return to the easier version whenever the change makes you tense or unstable.
When should you find a teacher?
Find a qualified yoga teacher if the pose feels confusing or repeatedly uncomfortable. Explain what you feel rather than asking whether your pose looks right. A useful teacher should welcome props, respect your limits, and help you choose another movement when necessary; adjustments should never involve pushing you into a twist you cannot comfortably control.
How is it different from triangle?
Regular triangle turns the chest in a different direction and does not use the same cross-body setup. In revolved triangle, the opposite hand comes toward the front foot as the chest turns toward that leg. Do not assume that ease in regular triangle means this version will feel easy, because the balance and movement demands are different.
What if your hamstrings feel tight?
Shorten the stance, bend the front knee, and raise your hand support. Those changes can give you more room without needing to pull against the back of the thigh. Use yoga for flexibility for broader practice ideas rather than treating this demanding shape as a required test of how flexible you are.
What if the two sides differ?
A difference between sides is a reason to adjust, not to force the stiffer side. You may need a higher block, less rotation, or a shorter stay on one side. Compare comfort and control rather than photographs, and ask a clinician about a new, painful, or unexplained change rather than assuming yoga will sort it out.
What can you practice instead?
A simple standing hip hinge can be a useful alternative when the twist does not suit you. Stand steadily, keep your hands on your hips, and explore a small forward tip without rotating. mountain pose is another place to return, and skipping revolved triangle still leaves many ways to build a satisfying yoga practice.
What mindset helps?
Treat the pose as an experiment in comfortable control rather than a shape to win. Your best version today may be upright, supported, and barely twisted, or it may be a different pose altogether. Finish with the sense that you listened to your body instead of measuring success by the height of your hand or the angle of your chest.
Where to read next
For a calm, beginner-friendly start, Ranjana Sinha’s Begin Where You Are is written for people who want simple steps. Our guide to starting a home yoga practice adds a gentle routine you can follow at home.
Frequently asked questions
Do I have to touch the floor?
No, use a stable block or firm chair at a height that lets you keep the movement comfortable.
Can I bend the front knee?
Yes, a small bend is a useful option when straightening the leg makes the setup strained or unstable.
Should I look at the upper hand?
No, keep your gaze down or forward if turning your head feels uncomfortable or changes your balance.
Can I skip the twist altogether?
Yes, a gentle standing hip hinge or another suitable pose is a valid alternative.
Will this pose fix back pain?
No, it is not a treatment, and back pain needs appropriate medical guidance rather than a forced twist.
The bottom line
Keep the support high, the turn small, and the choice to stop available throughout your practice.