Wind-Relieving Pose is a simple lying-down pose that many beginners turn to when their belly feels heavy, tight, or full of trapped gas after a long day. You lie on your back, hug one or both knees toward your chest, and breathe slowly. There is no balancing, no stretching to your limit, and no special strength needed. This guide walks you through each step, how long to hold it, how often to practice, and what the pose may and may not do for you.
This article is general education, not medical advice. If you have a health condition, recent surgery, or ongoing pain, talk with your doctor before trying new poses.
What is the wind relieving pose?
Wind-Relieving Pose is a floor pose where you lie on your back and draw your knees toward your chest. The Sanskrit name is Pawanmuktasana, and it is often taught near the start or end of a practice. The pressure of the thighs on the belly gives the pose its reputation for easing a gassy, heavy feeling. It asks for no balance and no deep flexibility.
Why do people practice it?
Most people come to this pose because their belly feels tight, bloated, or full after sitting all day. The knees press lightly into the abdomen, which many people find comforting. It is also a quiet way to slow down before bed. Some simply like how the lower back feels on the mat.
What does the Sanskrit name mean?
Pawanmuktasana combines the words for wind, release, and pose. The name points to the old idea that the pose helps trapped air move through the gut. You do not need to remember the name to get value from the pose. Calling it Wind-Relieving Pose works just fine.
Is wind relieving pose good for beginners?
Yes, it is one of the friendliest poses a beginner can learn. You stay on your back the whole time, so there is no fear of falling. The depth of the pose is easy to adjust with your arms. Most people can do a version of it on their first try.
What do you need before you start?
A mat or a folded blanket on the floor is enough. A small cushion under your head can help if your chin tips back. Our guide to yoga props for beginners covers simple items that make floor poses more comfortable. Wear clothing that lets your knees bend freely.
How should you set up?
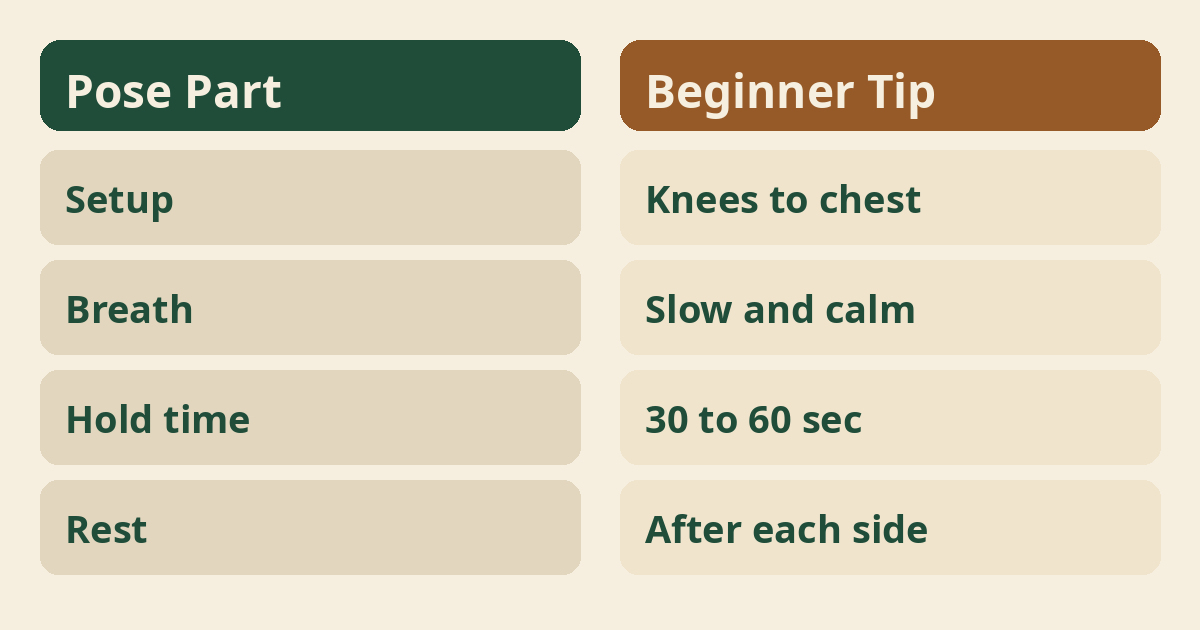
Lie down on your back with your legs stretched out and your arms resting by your sides. Take a moment to let your shoulders soften. Bend both knees and place your feet flat on the mat. This small pause helps your body settle before the pose begins.
Step one: hug your right knee in
Draw your right knee toward your chest and hold it with both hands. Clasp your fingers around your shin, or hold behind your thigh if that feels better. Keep your left leg long on the mat with the foot relaxed. Let your breath stay slow.
Step two: settle your shoulders
Keep both shoulders resting on the mat while you hold the knee. If your shoulder blades lift, ease the knee a little farther from your chest. The pose works without force. A relaxed upper body matters more than how close the knee gets.
Step three: switch sides
Release the right leg and draw your left knee toward your chest. Notice whether the two sides feel different, because they often do. Hold with the same slow breathing. There is no need to match one side to the other.
Step four: hug both knees
Bring both knees toward your chest and wrap your arms around your shins. Let your lower back spread across the mat. If your tailbone lifts a lot, move your knees slightly wider. Many people find this double version the most comfortable part of the pose.
Step five: add slow rocking
If it feels pleasant, rock your body slowly from side to side. Keep the movement small and easy. This can feel like a light massage for the lower back. Skip the rocking if it feels unsteady.
Step six: release and rest
Lower your feet to the mat and rest with your knees bent, or stretch your legs out long. Stay here for a few breaths and notice how your belly and back feel. Rest is part of the practice, not a break from it. Move slowly when you are ready to get up.
How should you breathe during the pose?
Breathe in and out through your nose at a pace that feels calm and unhurried. Let your belly rise against your thighs as you breathe in, and soften as you breathe out. If you are new to this kind of breathing, our belly breathing for beginners lesson shows the basics. Never hold your breath to press the knees closer.
How long should you hold it?
A hold of 30 seconds to one minute per stage suits most beginners. You can stay longer if the pose feels restful and your breathing stays easy. Short holds done with comfort beat long holds done with strain. Come out of the pose if anything pinches or numbs.
How often can you practice?
The wind relieving pose is mild enough for daily practice for most healthy people. A few minutes each day can add up over time. If you want help planning how often to roll out your mat, see how often should you do yoga. Listen to your body on tired days and keep the session short.
Can it ease a bloated belly?
Many people say the pose brings a feeling of relief when their belly feels full of trapped gas. The light pressure of the thighs may help the gut move things along. Results vary from person to person. It is a comfort measure, not a fix for an ongoing problem.
What are the benefits of wind relieving pose?
Many people find the pose eases belly pressure, relaxes the lower back, and calms the mind, though results vary. The benefits of the wind relieving pose are usually described as modest and personal. Some notice looser hips or easier digestion, while others mainly enjoy the quiet rest. Research on yoga for digestive comfort is still growing, and the national center for complementary health shares balanced summaries National Center for Complementary and Integrative Health. No single pose works the same way for everyone.
Is this a treatment for digestive problems?
No, this pose is not a treatment, cure, or therapy for any digestive condition. Ongoing bloating, pain, or changes in bowel habits deserve a medical visit, not just a yoga mat. The pose can sit alongside care from your doctor, not replace it. Think of it as one small comfort in a bigger health picture.
When should you talk to a doctor first?
Check with your doctor before this pose if you have a hernia, recent abdominal surgery, or ongoing belly pain. The same goes for any condition that affects your spine, hips, or gut. A quick conversation can save you weeks of trouble. Bring your questions to a professional who knows your history.
Who should be careful or skip it?
People who are pregnant, have had recent surgery, or live with certain back, hip, or gut conditions should be careful or skip this pose. Pressing the knees into the belly is not right for every body. If you are expecting, our note on prenatal yoga vs regular yoga explains how practice changes. When in doubt, ask your doctor before trying it.
What mistakes do beginners make?
The most common mistakes are pulling too hard, lifting the head, and holding the breath. Tugging the knees down with force can strain the neck and back. Craning the head up shortens the neck and adds tension. Keep the back of the neck long and let the arms do easy work.
Should your lower back stay on the mat?
Your lower back can rest on the mat or lift slightly, and both are fine. Bodies are built differently, so a small gap under the spine is normal. Do not press the back down with effort. Comfort is the goal, not a flat spine.
What if your knee hurts?
Hold behind your thigh instead of on top of your knee if the joint feels sore. You can also keep the knee a little farther from your chest. A folded towel behind the knee sometimes helps. Pain is a signal to change the shape, not push through.
One leg or both legs first?
Starting with one leg at a time is easier for most beginners. The single-leg version lets you learn the shape without crowding the belly. Move to both knees when the single version feels settled. There is no prize for skipping ahead.
Can you do it in bed?
Yes, the wind relieving pose works on a firm bed if getting to the floor is hard. A soft mattress makes the pose wobblier, so keep the movement small. This option suits mornings when the body feels stiff. Floor practice still gives the steadiest base.
How does it fit into a bigger practice?
This pose works well as a warm-up, a cool-down, or a quiet practice on its own. It pairs naturally with other restful shapes, such as child’s pose for beginners. For digestive comfort in particular, this pose is one small part of the approach in yoga-for-constipation-for-beginners, which looks at how a whole practice can support regularity. A few poses done slowly often beat many poses done in a rush.
What poses pair well with it?
Simple floor poses and hip openers pair well with Wind-Relieving Pose. Many people follow it with garland pose for beginners to keep the hips moving. Others finish with a long rest on the back. Keep the whole session slow and kind.
How do you progress over time?
Progress means longer, calmer holds and easier breathing, not a deeper squeeze. Over weeks, you may notice the knees come closer without effort. Some people add slow circles with the knees. Let change arrive on its own schedule.
Do you need a teacher?
A teacher is helpful but not required for this simple pose. A good teacher can spot habits you cannot feel, like lifted shoulders or held breath. One class or private session can set you up well. After that, home practice is enough for most people.
What mindset helps?
Treat the pose as a chance to rest, not a test to pass. Comparison with pictures online helps no one. Your version only needs to feel steady and easy in your body. Curiosity works better than effort here.
Why does breathing matter more than depth?
Slow breathing is what turns knee-hugging into a real practice. The breath presses the belly from the inside while the thighs press from the outside. Deep squeezing without breath awareness adds little. When in doubt, do less with the body and more with the breath.
What should you feel in the pose?
You should feel light pressure on the belly, a soft stretch in the lower back, and an overall sense of ease. Mild effort in the arms is normal. You should not feel sharp pain, numbness, or pinching in the hips. Come out of the pose if anything feels wrong.
What if your belly feels tender?
Keep the knees wider apart and the pressure light if your abdomen feels sensitive. You can also do the single-leg version only. Tender days call for kinder shapes. The pose will still be there tomorrow.
How do you build a small routine around it?
Two or three quiet minutes with this pose can anchor a short home routine. Add a few minutes of slow breathing and one or two other restful poses. Practice at the same time each day if that helps you remember. Small and steady wins over long and rare.
Where to read next
For a calm, beginner-friendly start, Ranjana Sinha’s Begin Where You Are is written for people who want simple steps. Our guide to starting a home yoga practice adds a gentle routine you can follow at home.
Frequently asked questions
Can I do wind relieving pose every day?
Many people practice it daily, and starting with a few calm sessions each week works well for most beginners.
Is wind relieving pose safe for seniors?
It can be a good fit for many older adults, though anyone with joint or heart concerns should check with a doctor first.
Will this pose fix my digestion?
No single pose can fix digestion, though many people find it brings a sense of ease in the belly area.
What time of day works best for this pose?
Any quiet time works, but many people prefer it on an emptier stomach, such as morning or a few hours after a meal.
Do I need to be flexible to hug my knees in?
No, you can hold behind your thighs or use a strap, and the pose still works without your knees touching your chest.
The bottom line
Start with a few slow breaths and one knee at a time, and let the pose meet your body exactly where it is today.