The figure four stretch is a simple way to explore a gentle stretch around the outer hip while lying on your back. You cross one ankle over the opposite thigh, then draw the supporting leg toward you only as far as feels comfortable. Start without forcing range or chasing a deep sensation. This guide explains the setup, options, and signs to pause so you can decide whether the position suits your body today.
This article is for general education and is not medical advice. If you have a health condition, pain, or an injury, check with your doctor or qualified clinician before trying a new stretch.
What is the figure four stretch?
The figure four stretch is a reclined position with one ankle resting over the opposite thigh. From above, the crossed legs resemble the number four, which gives the stretch its common name. People use different names for similar positions, so the shape matters more than the label. The movement can be kept very small; you do not need to pull hard or make the legs look like a perfect figure four.
Why do people try it?
People often try this position to spend a few quiet moments moving their hips gently. Some find it a useful pause after sitting or as one part of a broader movement routine. Others simply want to learn how the position feels. It is fine if you do not notice a distinct stretch, and you do not need to justify stopping when the position is not right for you.
Which area may feel involved?
The position may create a mild sensation around the outer hip or buttock of the crossed leg. The feeling can vary with your setup, range, and body shape. Some people notice more sensation in the thigh or nowhere in particular. A stretch should stay manageable, not sharp, electric, pinching, or alarming. Sensations are personal, so avoid using another person’s range as a measure for your own.
Choose a steady starting place
Begin on a comfortable, nonslip surface where you can lie down and get up without rushing. A yoga mat, firm carpet, or padded floor may work if it feels stable. Keep nearby items out of the way, and have a folded blanket or cushion ready if you want support. If lowering to the floor is difficult, start with the seated option described below rather than struggling into position.
Step 1: Lie down comfortably
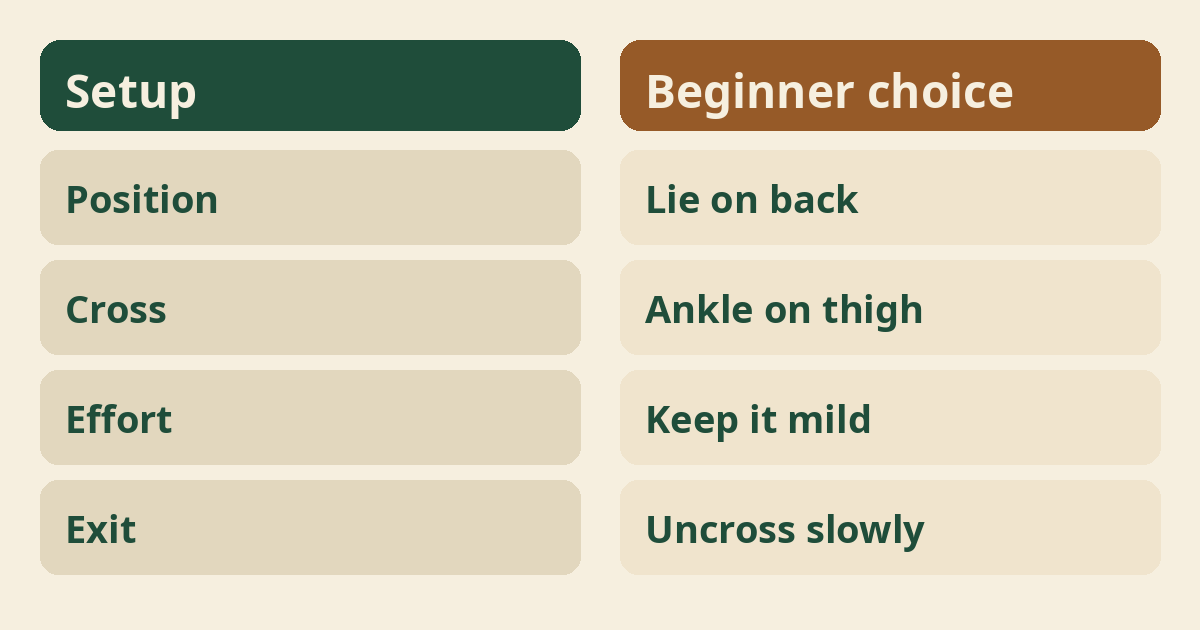
Lie on your back with both knees bent and both feet resting on the floor. Let your head and shoulders settle, and keep your lower back in a natural, comfortable position. Move your feet closer or farther from your body until the stance feels easy. You are not trying to flatten your spine against the floor; choose a position in which breathing stays relaxed.
Step 2: Place the ankle
Lift one foot and rest its ankle gently on the opposite thigh, above the knee. Keep the crossed foot relaxed rather than pointing or gripping the toes. The ankle should not be pressed into the knee joint. If reaching the position feels awkward, use your hands to guide the leg slowly, or stop and try again later with a smaller range.
Step 3: Check the knee
Let the crossed knee open only as far as it moves comfortably on its own. Do not push the knee down with your hand or lean your body weight into it. The knee can remain raised; it does not have to approach the floor. If the position creates pressure at the knee, uncross the legs and choose a different movement or ask a clinician about a suitable option.
Step 4: Stay where you are
Pause in the crossed-leg shape before adding any pull. Notice whether both sides of your body feel supported and whether your breathing remains easy. For many beginners, this setup alone is enough to explore the position. You can keep both hands resting by your sides, or place them lightly on your legs without pressing.
Step 5: Draw the supporting leg in
If the setup feels comfortable, hold behind the thigh of the supporting leg and bring it a little closer. Keep the crossed ankle resting gently on the thigh as you move. Use your arms to guide, not yank, and stop well before you feel forced. If reaching behind the thigh is difficult, loop a towel behind it and hold the ends with a light grip.
Step 6: Settle and release
Stay for a few calm breaths, then lower the supporting foot and uncross slowly. Move in a controlled way rather than dropping the leg or twisting to escape the pose. Rest with both feet on the floor for a moment before changing sides. A pause between sides gives you time to notice how you feel and to choose whether you want to continue.
How should I breathe?
Let the breath stay quiet and natural throughout the position. There is no need to hold your breath or take unusually deep breaths. If a gentle exhale helps you soften your grip, use it without pushing farther into the stretch. Breathing should remain comfortable; come out of the position if the pose makes you feel strained, dizzy, or unable to breathe normally.
How long should I stay?
Begin with a brief, comfortable hold rather than aiming for a fixed duration. A few relaxed breaths can be enough to learn the position. If you remain comfortable, you may stay for a little longer, but time is not a score. Ease out sooner if your attention turns to discomfort, you start gripping, or you find yourself waiting impatiently for the hold to end.
How often can I practise?
Choose a frequency that fits your routine and leaves you feeling comfortable. There is no single schedule that suits everyone, and more practice is not automatically better. You might include the stretch occasionally or alongside other gentle movement. For general ideas about planning practice, see how often to do yoga. If symptoms or a medical condition shape your activity, ask your clinician about an appropriate plan.
What should the stretch feel like?
Aim for a mild, steady sensation that you can accept without bracing. It may feel like gentle tension around the outer hip, but the exact place and intensity vary. You should be able to breathe, speak, and release the position on your own. There is no need to reach a strong sensation for the stretch to count as practice.
When is the sensation a warning?
Stop if you feel sharp pain, tingling, numbness, a sudden pull, or pressure in a joint. Do not try to breathe through a warning sensation or assume it will fade if you hold longer. Uncross the legs slowly and rest in a neutral position. If a concerning feeling continues, returns, or worries you, contact a qualified health professional for advice rather than experimenting with stronger versions.
Common mistake: pulling too hard
Pulling the supporting leg close can make the pose feel more intense, but intensity is not the goal. Use only enough arm effort to guide the leg. Keep the shoulders relaxed and jaw unclenched, and leave room to move back out. If you have to strain, hold your breath, or brace your body to stay there, reduce the range or return to the starting position.
Common mistake: pressing the knee
Pressing the crossed knee toward the floor is not needed for this stretch. The knee joint is not a lever for forcing the hip to move. Let gravity act only if the leg rests comfortably, and do not add a hand, strap, or another person’s pressure to push it lower. A raised knee can be a perfectly valid version of the pose.
Common mistake: twisting the body
Keep your pelvis and shoulders as relaxed and even as you comfortably can. It is common to shift or twist while trying to pull the leg closer, but that can change the position and make it harder to judge how it feels. Use a smaller range if you cannot stay settled. A stable, easy shape is more useful than a dramatic one.
Use props for support
A towel, strap, cushion, or folded blanket can make setup easier. A towel behind the supporting thigh can bring your hands closer without requiring a deep reach. A small cushion under your head may help you settle, while a folded blanket can pad a firm floor. Props should make the position easier to manage, not help you force a deeper stretch; see yoga props for beginners.
If your knee feels sensitive
Leave out the crossed-leg position if it puts pressure or discomfort in your knee. You can try placing the ankle lower on the opposite thigh, but do so only if the knee remains comfortable and relaxed. Another option is to keep both feet down and choose a different movement. If another part of your body is uncomfortable, stop and choose a different movement; get individual advice when needed.
Who should check with a doctor first?
Ask your doctor or qualified clinician before trying this if a health concern could affect your movement. This is especially important with a recent hip, knee, or back injury or surgery, ongoing joint symptoms, significant pain, or a condition that limits your range. If you are pregnant and unsure whether lying on your back is appropriate for you, ask your maternity clinician first. Do not use this article to decide what is safe for a personal diagnosis.
Is this a treatment?
No, the figure four stretch is a movement position, not a treatment. It cannot tell you what is causing pain or whether a particular condition needs care. Do not use it in place of advice from a health professional or delay an assessment because a stretch feels pleasant. If you want help with a symptom, a clinician can consider your history and suggest choices for your circumstances.
Possible benefits
Many people find a gentle stretch pleasant, but results vary from person to person. You may enjoy the pause, the chance to move after sitting, or the feeling of practising at a measured pace. These are personal experiences, not promised outcomes. For broader, cautious information about yoga and health, see National Center for Complementary and Integrative Health, and discuss personal health questions with a qualified professional.
Progress gradually
Begin with the easiest version and change one detail at a time. First see whether the ankle-over-thigh shape feels comfortable without pulling. On another occasion, you might test a slightly closer leg position, provided there are no warning signs. Keeping changes small makes it easier to notice what feels different and to return to a version that suits you.
Try a seated option
A chair version may be easier if getting down to the floor is inconvenient. Sit near the front of a stable chair with both feet supported. If it feels comfortable, rest one ankle on the opposite thigh without pushing the knee, and lean forward only a little from the hips. Skip the option if the knee, hip, balance, or back feels uncomfortable, and keep a hand on the chair for steadiness.
How to come out of the pose
Release the stretch in the reverse order of how you entered it. Let go of the thigh first, lower the supporting foot, and then uncross the legs without jerking. Take a breath with both feet on the floor before sitting up. If you feel unsteady, roll onto your side and use your arms to help you rise slowly.
Compare sides gently
Notice each side without expecting them to feel or move the same. One side may feel tighter, easier to reach, or simply different from the other. Do not pull harder on the side with less range to make the two match. Try a comfortable version on each side, and stop if either side brings a concerning sensation.
At a desk break
You can use a short movement break to change position after sitting for a while. If there is room and it feels safe, use the seated option or stand and move around instead. A desk break does not have to include a deep stretch to be worthwhile. See beginner yoga at your desk for other gentle ideas, and choose movements that suit your setting.
After a walk or activity
You may choose to try the stretch after activity if you feel settled and comfortable. Let your breathing return to its usual pace first, and do not use the position to push through soreness or a new pain. A quiet cool-down can include ordinary rest and easy movement. If activity has left you feeling unwell, stop and seek appropriate help rather than adding a stretch.
Working with a yoga teacher
A qualified teacher can help you understand setup and offer options during a class. Tell the teacher about relevant limits before practising, and ask them not to push your knee or leg. A teacher can observe your position, but cannot replace a clinician’s assessment of an injury or health condition. You may decline hands-on adjustments and choose to watch or rest at any time.
Keep a beginner mindset
Treat the stretch as an experiment in comfort, not a test of flexibility. You do not need to look like a photograph or reach your foot with your hands. It is normal for a pose to feel different on different days. If the position does not suit you today, choosing a smaller shape or skipping it is a reasonable way to practise awareness.
Pair it with other gentle movement
The figure four stretch can sit alongside other easy movements if each feels comfortable. You might move slowly between a relaxed standing posture and a supported rest, or add simple hip movement without forcing range. Explore butterfly pose for beginners as a separate option, not as a required next step. Stop any movement that causes pain or feels unsuitable for your body.
When should I stop?
Stop the session when discomfort, strain, or uncertainty makes it hard to stay relaxed. Return to a comfortable position and give yourself time to notice how you feel. Do not repeat the movement immediately to check whether the warning will happen again. Seek professional guidance if a symptom is new, persistent, worsening, or concerning to you.
Why might one side feel different?
Differences between sides are common, and they do not automatically mean something is wrong. Daily habits, recent activity, and individual movement patterns can all affect how a position feels. Still, a new or marked difference paired with pain or loss of function deserves attention from a clinician. Keep your practice gentle, and do not try to correct the difference by forcing the tighter side.
What if I do not feel a stretch?
Not feeling a clear stretch is a good reason to stay gentle, not to pull harder. People have different ranges and sensations, and the position may be subtle for you. You can simply rest in the shape for a breath or two, choose another movement, or finish the practice. No particular sensation is required to make a thoughtful choice about your body.
Make the practice your own
Use the version that lets you remain calm, steady, and able to stop easily. You can practise on one side, on both sides, or not at all. Keep a nearby support within reach and make the movement smaller whenever needed. A useful beginner routine is one you can approach without pressure and leave without needing to prove anything.
Where to read next
For a calm, beginner-friendly start, Ranjana Sinha’s Begin Where You Are is written for people who want simple steps. Our guide to starting a home yoga practice adds a gentle routine you can follow at home.
Frequently asked questions
What is the figure four stretch?
It is a reclined or seated position with one ankle resting gently across the opposite thigh.
Should I push my knee toward the floor?
No, let the knee stay wherever it feels comfortable without pressure.
How long should a beginner hold it?
Start with a few relaxed breaths and stop sooner if anything feels uncomfortable.
Can I do this stretch in a chair?
You can try a supported seated version if your knee, hip, balance, and back feel comfortable.
Should I try it if I have an injury?
Ask your doctor or qualified clinician before trying a new movement when you have an injury or relevant condition.
The bottom line
Start small, keep the position comfortable, and choose another option whenever this stretch does not feel right for you.