A seated forward bend is a simple way to explore folding from the hips while sitting with your legs in front of you. Sit on a folded blanket, bend your knees as much as you need, and reach only as far as you can stay at ease. Your hands do not need to touch your feet. The pose can be quiet and small; a long spine and comfortable breathing matter more than depth.
This article is general education, not medical advice. Check with your doctor before trying yoga if you have a health condition, recent injury, ongoing pain, or questions about whether this pose is suitable for you.
What it is
A seated forward bend is a seated pose where the torso tips toward the legs. You can keep your spine long and your knees bent, with your hands resting on your thighs or shins. The shape is personal, and there is no required distance to travel.
Why people do it
People often use this pose to practice a quiet, forward-folding position. Some enjoy its unhurried pace after a busy day or as one part of a gentle movement routine. It is also a chance to notice posture and breathing without needing special equipment.
The main idea
Begin by hinging from the hip creases rather than pulling your head toward your knees. A small lean with a comfortable back can be more useful than a deep reach that feels strained. Think of lengthening the front of the body before folding, then stop where the position stays manageable.
Prepare your space
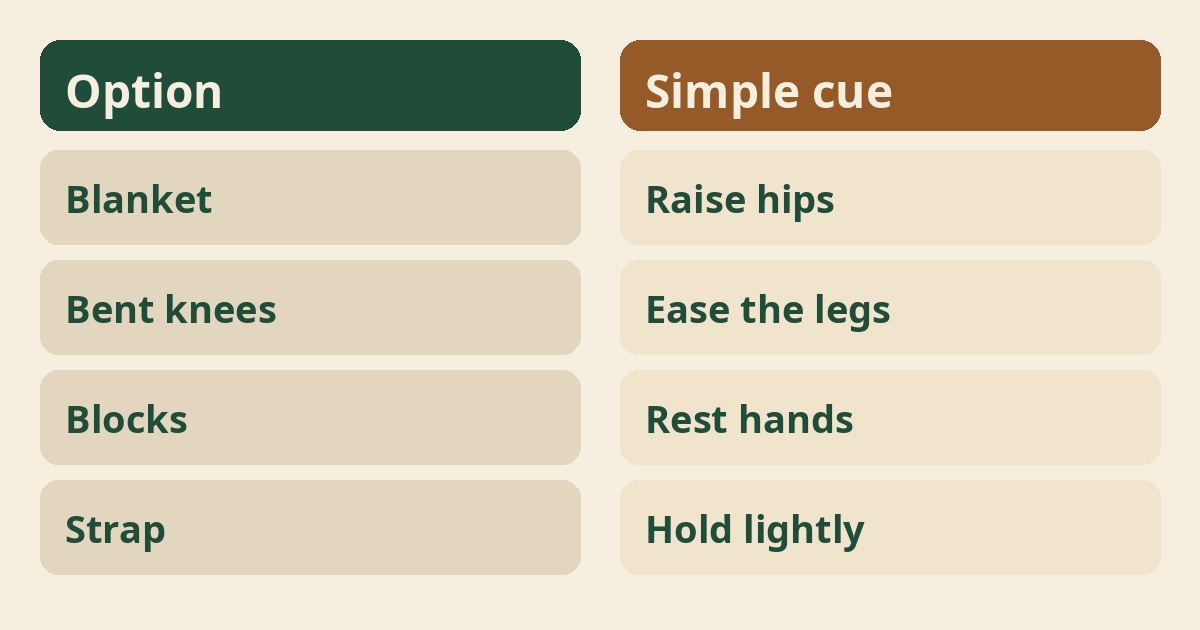
Choose a clear, level place where you can sit without slipping. A yoga mat or carpet can make the seat more comfortable, while a folded blanket can raise your hips. Keep blocks, cushions, or a strap close if you already use them.
How to start
Sit with both legs extended and find a height that lets you sit steadily. If your back rounds sharply or your hips tip backward, bend your knees or sit on a folded blanket. Let your hands rest beside your thighs and take a moment to settle.
Step one: set the legs
Keep your legs relaxed and bend the knees whenever that feels easier. The backs of the knees do not need to press into the floor. Point your toes naturally, or let the feet rest without forcing them into a particular position.
Step two: find the seat
Sit on the front part of your sitting bones, with your weight balanced. You may shift gently from side to side to find a stable base. If you cannot sit comfortably, add height under your hips or choose another seated position.
Step three: make space
Inhale and imagine the crown of your head moving upward. Let your shoulders stay soft while your chest feels broad and unforced. This is not a demand to arch the back; simply make room through the torso before moving.
Step four: hinge forward
Exhale and tip forward a little from the hip creases. Keep the movement small at first, and let your hands slide along your thighs only if that is comfortable. You can also place your hands on blocks in front of your legs.
Step five: pause and return
Stay for a few easy breaths, then lift your torso slowly to sit upright. Use your hands on your legs or the floor for support if needed. Move out before you feel trapped, and take a moment to notice how the seat feels afterward.
Breathing
Let your breath remain smooth and unforced while you hold the pose. Avoid trying to push deeper with each exhale or holding your breath to keep a shape. If breathing becomes difficult or tense, come out and sit comfortably.
How long to stay
Start with a brief pause of a few comfortable breaths. You do not need a timer or a fixed count, especially while learning the position. Leave enough time to return upright slowly and notice whether you feel settled or strained.
How often
Practice only as often as it feels comfortable within your broader routine. There is no universal schedule that suits every person, and rest days are fine. For general ideas about building a routine, see how often to do yoga.
Use a folded blanket
A folded blanket under the hips can make sitting more manageable. Choose a height that feels steady rather than perched, and adjust it if you slide. For more ideas on choosing support, see yoga props for beginners.
Use a strap
A strap can bring your hands closer without tugging at your feet. Loop it loosely around the feet only if that feels safe and easy to release. Hold it lightly, keep your elbows soft, and avoid pulling your body into a deeper fold.
Bend your knees
Bent knees are a useful option, not a mistake to correct. A little bend may reduce the urge to round or strain while you are learning. You can place a rolled blanket under the knees if that makes the position more comfortable.
Common mistake: forcing depth
Reaching farther is not the goal of this pose. Pulling on your feet or bouncing can make the movement feel abrupt and harder to control. Keep your hands light, choose a smaller range, and return upright if you feel sharp or increasing discomfort.
Common mistake: rounding to reach
Letting the back round to get closer is not required. If you notice a collapse through the torso, sit higher, bend the knees, or reduce the fold. A smaller movement that feels steady is a valid version of the pose.
Common mistake: locking the knees
Your knees do not need to be pressed down or locked straight. Keep a soft bend if that suits you, and avoid pushing the backs of the legs into the floor. If the knees feel uncomfortable, change the leg position or stop.
Common mistake: holding the breath
Easy breathing is a better guide than trying to hold a perfect shape. If you catch yourself bracing or holding your breath, ease out of the fold and reset. The pose can be brief, and you can skip it on a day it does not feel right.
Common mistake: comparing shapes
Your fold does not need to look like anyone else’s. Differences in body proportions, mobility, and comfort can change the position. Use your own experience as the guide, and remember that hands reaching the feet are not a measure of success.
Who should be careful
Ask your doctor first if a health condition or recent injury may affect this movement. This is especially important if you have symptoms, a medical restriction, or uncertainty about sitting or folding safely. Stop if you notice sharp pain, numbness, dizziness, or other concerning symptoms, and seek appropriate care.
Back concerns
A seated fold may not suit every person with back symptoms. Choose a comfortable alternative if the position increases discomfort, and do not use this pose to test or push through pain. The article yoga with a bad back offers general context, but your clinician can advise on your situation.
Knee or hip concerns
Modify or skip the pose if sitting with extended legs is uncomfortable. You might sit higher, bend your knees, or choose a chair-based position, but avoid assuming a modification is right for a specific condition. Ask your doctor or physical therapist for guidance tailored to you.
Is this a treatment?
No, this pose is not a treatment for a health condition. Yoga movement can be part of general wellbeing for some people, but it should not replace diagnosis or care from a qualified professional. If you have a concern, talk with your doctor about suitable options.
Possible benefits
Many people find a gentle forward fold calming or pleasant, but results vary. A slow position may offer a moment to pay attention to the body and breath, though individual experiences differ. For general information on yoga research, see National Center for Complementary and Integrative Health and discuss health questions with a qualified clinician.
Flexibility and comfort
Some people include the pose while exploring comfortable movement through the back of the legs. Sensations differ, and stretching farther is not a promise of better results. If you are interested in gentle flexibility practice, read yoga for flexibility for beginners and keep your movements within an easy range.
Progress gradually
Change one thing at a time as you learn what feels steady. You might begin with a more upright seat, then experiment with a small hinge on another day. Avoid adding depth, longer holds, and stronger pulling all at once.
Try a smaller version
You can practice the setup without folding forward at all. Sit on a chair or blanket, place your hands on your thighs, and notice whether the position feels comfortable. A small nod or slight hip hinge is enough if that is what works for you.
Use a chair
A chair can make the seated position more accessible for some people. Sit toward the front of a stable chair, keep your feet supported, and hinge only a little if it feels comfortable. Do not use a rolling chair, and stop if the setup feels unsteady.
A teacher can help
A qualified yoga teacher can offer options and help you understand the basic shape. Tell the teacher about relevant limitations before class and ask for alternatives without pressure. A teacher does not replace medical advice, and you can decline any adjustment that does not feel welcome.
Mindset
Curiosity and patience can make practice feel less like a test. There is no need to reach a particular point or compare yourself with pictures. Notice what feels steady today, and allow the pose to be different another time.
Pair it with gentle movement
You may prefer to warm up with simple movements before sitting still. Gentle spinal movement such as cat-cow pose or resting in child’s pose may suit some routines, but neither is required. Choose movements that feel comfortable and skip anything that does not.
After the pose
Sit upright for a moment before moving on. Let your legs relax and notice whether you feel comfortable, neutral, or ready to stop. If you feel unusual or worsening symptoms, do not continue the sequence and seek suitable advice.
When to skip
It is fine to skip this pose when it feels unsuitable or unwelcome. A yoga routine can include other positions, breathing, or rest, depending on what you can do comfortably. There is no single pose that everyone must practice.
Keep it simple
A stable seat, soft knees, and an easy breath are enough to begin. The pose does not need special clothing, a deep fold, or a complicated routine. Keep the movement gentle, use support when helpful, and return upright with control.
Where to read next
For a calm, beginner-friendly start, Ranjana Sinha’s Begin Where You Are is written for people who want simple steps. Our guide to starting a home yoga practice adds a gentle routine you can follow at home.
Frequently asked questions
Do I need to touch my toes?
No, keep your hands wherever they rest comfortably.
Should my knees be straight?
No, bend them if that helps you sit and fold comfortably.
How long should I hold the pose?
Stay for a few easy breaths or less, then return upright slowly.
Can a beginner try this pose?
A beginner can explore a small version if it feels comfortable and appropriate.
What should I do if it hurts?
Stop, come out gently, and ask a qualified clinician if symptoms concern you.
The bottom line
Keep the fold small, breathe easily, and choose comfort over reaching farther.