Half splits pose is a floor position that gently lengthens the back of the front leg. You can practice it with your hands on blocks or a chair, and you do not need to straighten your knee fully. Start in a small range, keep breathing, and come out if you feel sharp pain, tingling, or numbness. This guide explains a steady setup and ways to adjust it for your body.
This is general education, not medical advice. Check with your doctor before trying yoga if you have a health condition, injury, recent surgery, or concerns about movement.
What is half splits pose?
Half splits pose is a kneeling position with one leg extended in front. The hips stay behind the front foot as the chest reaches forward. It is often called Ardha Hanumanasana, though shapes can vary between teachers. You can use support and keep a soft bend in the knee.
Why do people practice it?
People often use half splits as a slow stretch for the back of the front leg. The position can also give you a chance to notice balance, breath, and alignment. Sensations differ from person to person, so aim for a mild stretch rather than a dramatic shape. The pose is optional, not a test of flexibility.
Start with a steady base
Set up on a nonslip surface with enough room to extend one leg. Begin on hands and knees, with your shoulders over your wrists and hips over your knees. If kneeling is uncomfortable, place padding under your knees or choose a seated leg stretch instead. Keep a chair or blocks nearby before moving.
Step 1: Bring one foot forward
Place one foot between your hands to make a low lunge. Keep your front foot planted and your back knee on the mat. If your foot does not reach comfortably, guide it forward with your hand rather than forcing a long step. Let the front knee bend as much as needed to feel stable.
Step 2: Shift your hips back
Move your hips toward the back knee while lengthening the front leg. Your hips travel back, not down, and the front heel stays grounded. The toes may lift gently, but they do not have to point toward your face. Keep both hands supported on the floor, blocks, or a sturdy chair.
Step 3: Keep a knee bend
Leave a small bend in the front knee instead of locking it straight. A soft knee can make it easier to control the stretch and avoid forcing the joint. Keep the kneecap pointing in line with the second or third toe. If the knee feels strained, bend it more or leave the pose.
Step 4: Find a comfortable torso angle
Hinge forward only as far as you can keep breathing easily. You can stay upright, bring your hands to blocks, or rest them on a chair seat. Lead with a long spine rather than rounding to reach your foot. The hands help with balance; they do not need to touch the floor.
Step 5: Adjust the back leg
Keep the back knee padded and the lower leg relaxed. The top of the back foot may rest on the floor, or you can tuck the toes if that feels steadier. Avoid pushing hard through the back knee. If kneeling itself causes discomfort, come out and try a supported seated version.
Step 6: Check the hips
Let both sides of your pelvis face generally forward without forcing them square. Some natural difference between sides is normal. Make a small adjustment if one hip rolls far back or the torso twists, but do not wrench your pelvis into a fixed position. Use your hands on supports to keep the movement easy.
Breathing in the pose
Breathe naturally and keep the breath smooth rather than held. Try an unhurried inhale and exhale while staying within a mild stretch. If you notice yourself bracing, shorten the stance or raise your hands. You can also explore belly breathing before practicing, without changing your normal breathing pattern.
What should the stretch feel like?
A mild, broad pull along the back of the front thigh may be comfortable. Sensation should remain manageable and should not feel sharp, burning, electric, or numb. You may feel the stretch in a different place from someone else. Reduce the range when the feeling is too intense, and stop if it does not settle.
How long should you stay?
Begin with a few comfortable breaths, then come out and reassess. There is no required hold time for this pose. A shorter stay can be a useful start, especially if you are new to kneeling or stretching. Increase only when the position remains comfortable and your breathing stays easy.
How often can you practice?
Practice only as often as feels comfortable for your body and routine. You might include the pose during an occasional yoga session, then notice how you feel afterward. Repeating it every day is not necessary. See how often to do yoga for general routine ideas, and adjust if the pose leaves you sore.
Common mistake: forcing a straight leg
Do not press the front knee down just to make the leg look straight. A slight bend is a valid version of the pose. Forcing extension can make it harder to relax and notice your limits. Move gradually and keep your heel supported; there is no prize for reaching a particular angle.
Common mistake: reaching for the foot
Avoid pulling your toes toward you or grabbing your foot to deepen the stretch. Reaching can tip your weight forward and add intensity before you are ready. Place your hands where they support balance instead. A block, chair, or hands on the floor can all be appropriate, depending on your proportions and comfort.
Common mistake: collapsing the chest
Try not to round your back solely to get closer to the leg. Keep the front of your torso long, even if that means sitting higher. You can bend the knee and raise your hands to reduce the reach. Small, steady adjustments are usually easier to manage than a deep fold.
Common mistake: ignoring the back knee
Do not keep kneeling through pain at the back knee. Add a folded blanket or pad, shift some weight into your hands, or stop. If padding does not make kneeling comfortable, choose another position. Protecting the knee matters more than completing a pose sequence.
Use blocks or a chair
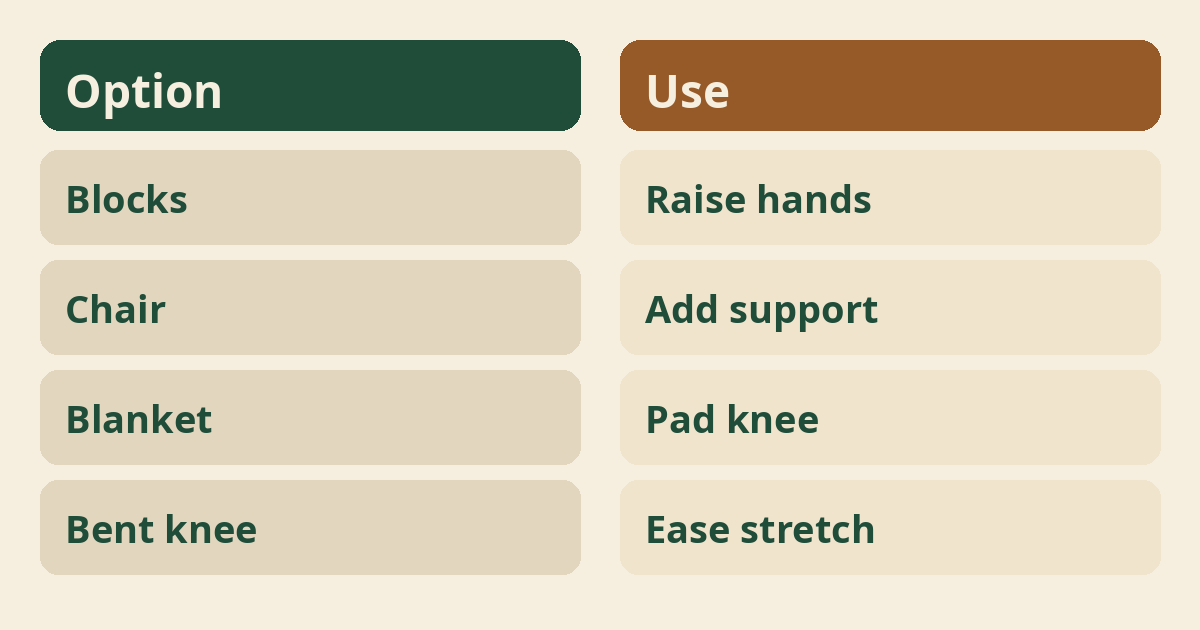
Blocks and a sturdy chair can bring the floor closer to your hands. Put blocks on a stable setting and keep them within easy reach. A chair should not slide or tip, and its seat should be clear. Learn more about yoga props for beginners if you want simple support ideas.
Use a strap only if useful
A strap is optional and is not needed to pull yourself deeper. If a teacher suggests one, use it gently and avoid tugging on the foot. Some people do better with their hands on blocks and no strap at all. The right prop is the one that helps you feel steady without adding strain.
Who should be careful?
Ask your doctor before practicing if you have a condition or injury that may affect movement. This includes recent surgery, significant knee or hamstring concerns, balance problems, or symptoms that are new or unexplained. Pregnancy can change comfort and balance, so seek guidance suited to your situation. A yoga teacher can offer options but cannot diagnose a health concern.
Stop signs
Come out if you feel sharp pain, numbness, tingling, or sudden weakness. Also stop if you feel dizzy, unwell, or unable to breathe comfortably. Move slowly as you exit and use your hands for support. If symptoms persist or worry you, contact a qualified health professional rather than trying to stretch through them.
Is this a treatment?
No, half splits pose is not a treatment for a health condition. It is a yoga position that some people include in movement practice. Do not use it in place of medical care, rehabilitation advice, or a plan from your clinician. For general information about yoga and health, see National Center for Complementary and Integrative Health.
Possible benefits
Many people find that a gentle practice helps them notice movement and body sensations. Some also enjoy the feeling of a mild stretch or the quiet focus of holding a supported position; results vary. These experiences are personal and do not show that the pose treats a condition. Keep your goal simple: comfort, awareness, and a steady breath.
How to make it gentler
Bend the front knee more, raise your hands, or shorten the time. You can also sit on a folded blanket or use padding below the back knee. Try only one adjustment at a time so you can tell what changes. If no version feels comfortable, skip the pose and choose another movement.
How to make it steadier
Place your hands on a fixed support and widen your base slightly. Keep the front foot grounded and move slowly between the lunge and the stretch. Avoid balancing with your hands hovering if that feels uncertain. You may practice near a wall or with a teacher present while learning the setup.
How to come out
Bend the front knee and shift forward before moving the leg back. Press gently into your hands, return to the low lunge, and bring the front knee beside the back knee. Pause on hands and knees or sit back only if that is comfortable. Repeat on the other side after a brief rest.
Switching sides
Practice the other side with the same care, not the same depth. Bodies often feel different from one side to the other. Adjust the bend, height, and support separately rather than trying to match the first side. You can skip the second side if symptoms or discomfort appear.
After the pose
Take a moment to notice whether your legs and knees feel comfortable. Stand or move slowly, especially if you have been kneeling for a while. A few easy steps or a relaxed rest may feel better than immediately entering another deep stretch. If discomfort lingers or worsens, avoid repeating the pose for now.
Progress over time
Progress can mean feeling steadier, not reaching farther. You might notice that setup takes less effort or that you can breathe comfortably with your hands supported. There is no need to chase a straight leg or deeper fold. Keep the range modest and let your comfort guide any changes.
Pair it with simple movement
Gentle movement before or after the pose can help you explore your range gradually. Some people like a few rounds of Cat-Cow Pose or a rest in Child’s Pose. Choose movements that feel comfortable, and do not treat a sequence as mandatory preparation. Stillness or skipping the pose is fine too.
Working with a teacher
A qualified yoga teacher can help you find a supported variation. Tell the teacher about pain, limitations, or movements you have been advised to avoid. You can decline hands-on adjustments and ask for verbal guidance instead. If you have medical questions, speak with your clinician, since a yoga class is not a medical assessment.
Mindset for beginners
Treat the pose as a place to practice patience rather than prove flexibility. Your body does not need to copy a picture or another student’s position. A small stretch with a steady breath is a complete practice. On some days, choosing a different movement is the most useful choice.
Can I keep my hands on blocks?
Yes, you can keep your hands on blocks or a chair throughout. Support is part of the pose, not a shortcut. Adjust the height so your shoulders and breath feel relaxed, and make sure the surface is stable before leaning on it.
Do my toes have to point up?
No, your toes do not need to point straight upward. Let the foot rest in a position that feels comfortable while keeping the heel grounded if possible. Avoid pulling the toes toward you to create a stronger stretch.
Should both legs be straight?
No, the front knee can stay bent and the back leg can remain relaxed. The main idea is a comfortable position with support, not a rigid shape. If either knee feels uncomfortable, change the pose or stop.
Can I skip half splits?
Yes, you can skip it whenever it does not suit you. Yoga includes many ways to move, rest, or build a practice. Choose a comfortable alternative, such as a simple seated leg position, if that works better for you.
Where to read next
For a calm, beginner-friendly start, Ranjana Sinha’s Begin Where You Are is written for people who want simple steps. Our guide to starting a home yoga practice adds a gentle routine you can follow at home.
Frequently asked questions
What does half splits pose stretch?
Many people feel a mild stretch along the back of the front leg, though sensations vary.
Can beginners use props?
Yes, blocks, a chair, and knee padding can make the setup more supported.
Should my front knee be locked?
No, keep a soft bend if that feels more comfortable.
How long should I hold the pose?
Start with a few comfortable breaths and leave sooner if needed.
Is half splits pose a treatment?
No, it is a yoga position and not medical treatment.
The bottom line
Practice half splits gently, use support freely, and stop whenever your body asks for a change.