Stiffness can make everyday movement feel uncertain, but it does not mean you should push through pain or copy a demanding routine. This beginner’s guide explains how to approach gentle yoga with careful choices, simple options, and medical guidance when needed. It is educational, not a diagnosis or treatment plan.
Speak with a doctor or other qualified clinician before starting yoga if you have persistent or unexplained stiffness, a diagnosed joint or connective-tissue condition, a recent injury or surgery, swelling, significant pain, balance concerns, or a health condition that affects movement. Ask what movements and limits are appropriate for you. Seek urgent medical help for sudden severe pain, a hot or markedly swollen joint, fever with joint symptoms, a new inability to bear weight, or symptoms after a serious injury. Stop any movement that causes sharp pain, numbness, dizziness, or worsening symptoms. Yoga does not diagnose, treat, or cure joint conditions.
What stiffness can mean
Joint stiffness has many possible causes, so it should not be self-diagnosed from a yoga article. Stiffness may be temporary after rest, or it may relate to injury, a health condition, medication, or another factor. The sensation alone cannot tell you which explanation applies. Notice when it occurs, how long it lasts, which movements are limited, and whether pain, swelling, warmth, or other symptoms accompany it. Share those details with a clinician if the stiffness persists, returns, or concerns you. For general information about yoga research and safety, see National Center for Complementary and Integrative Health.
Why a clinician comes first
A clinician can help you decide whether yoga is suitable and what to avoid. The right movement depends on your health history and the joint involved. A doctor, physical therapist, or other qualified professional can assess symptoms and give individual limits; this article cannot do that. Bring questions such as whether weight-bearing is safe, whether a chair is useful, and which positions should be avoided. Follow the advice you receive, even if it differs from a general yoga suggestion here.
A beginner’s safety rule
Move within a comfortable range and do not force a joint toward an end position. The aim is not to stretch as far as possible. Make each motion small enough that you can breathe normally and stay in control. Avoid bouncing, pulling a limb into place, leaning hard on a joint, or asking another person to push you deeper. If a pose requires you to ignore a warning sensation, leave it out and choose a simpler position.
Pain is not a progress score
Sharp, increasing, or unusual pain is a reason to stop rather than push harder. Some people notice mild effort or a gentle stretch, but pain is not a target and should not be used to measure success. Stop if discomfort becomes sharp, spreads, intensifies, or changes your movement. Also stop for pins and needles, numbness, dizziness, unusual shortness of breath, or weakness. If a symptom does not settle or keeps returning, seek individual medical advice before trying again.
Prepare a safe space
Set up a stable, uncluttered area before you begin moving. Use a nonslip floor and keep a sturdy chair within reach; place it against a wall if needed so it cannot slide. Leave room to stand or sit without bumping furniture. Wear clothing that lets you move without catching under your feet. Keep water nearby if appropriate for you, and avoid practicing on a soft bed where balance and support may be unreliable.
Choose support before the pose
A chair, wall, or cushion can make a position easier to control. Support is not a shortcut or a sign that you are doing yoga incorrectly. Sit on a firm chair with both feet supported, stand near a wall, or place a cushion under a comfortable area if your clinician says that is appropriate. Do not use an unstable stool, rolling chair, or furniture that may shift when you lean on it.
Start with a check-in
Before moving, notice how you feel today and identify any symptoms that change your plan. Ask yourself whether the stiffness is familiar or new, whether pain or swelling is present, and whether you feel steady. Do not start a routine if symptoms are sudden, severe, or unexplained. Consider writing down what you notice and when it happens. A simple record can help you describe the pattern to a clinician without guessing at its cause.
Use an easy pace
Slow, deliberate movement gives you time to notice how your body responds. Avoid trying to match a video or another person’s speed. Move, pause, and return to a comfortable position without rushing. Breathe in a natural way rather than holding your breath to complete a movement. If coordinating breath and movement feels difficult, let the breath stay easy and focus on steady control instead.
Begin seated if that feels safer
A supported seated position can be a practical starting point for some beginners. Sit toward the front or middle of a firm chair, whichever feels more secure, with feet resting on the floor or a stable support. Keep your spine in a comfortable position rather than forcing it upright. If sitting itself causes pain, pressure, dizziness, or instability, stop and ask a clinician about alternatives instead of improvising.
Gentle hand opening
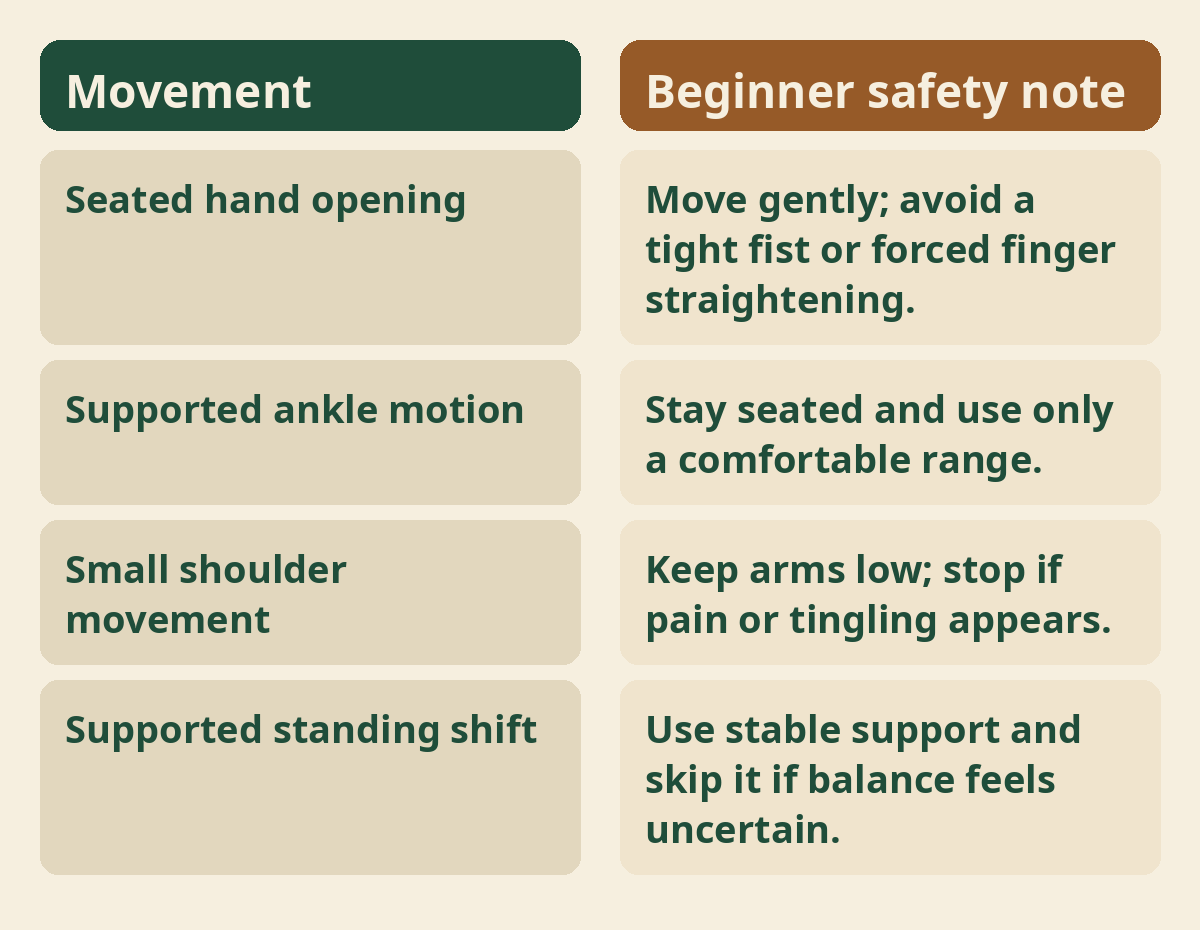
Open and close your hands slowly only through a range that feels comfortable. Rest your forearms on your thighs or a table. Let the fingers lengthen without forcing them straight, then make a loose, easy curl rather than a tight fist. Keep the wrists relaxed. This is a small movement, not a grip-strength test. Skip it if it increases hand pain, swelling, tingling, or any symptom your clinician has told you to avoid.
Wrist movement with care
Small wrist movements should stay controlled and comfortable. With forearms supported, turn the palms gently upward and downward only as far as feels easy, or make a small wrist bend if that is permitted for you. Do not circle quickly or load the wrist by leaning on your hands. If the wrist is injured, swollen, recently operated on, or painful, get specific guidance before practicing wrist motions. See gentle wrist stretches.
Shoulder movement without strain
Keep shoulder movements small and avoid forcing the arms overhead. If comfortable, let the shoulders rise slightly and then relax, without squeezing or jerking. You can also draw a small, easy circle if that feels natural. Stop if the movement causes pain in the shoulder, neck, chest, or arm. A smaller movement or keeping the arms resting may be the better choice; overhead range is not required for a useful practice. Try gentle shoulder rolls.
Neck stays easy
Neck movement should be gentle, and the head should never be pulled by the hands. Sit or stand supported and look straight ahead first. If it is comfortable, turn your head a little to one side and return to center, then consider the other side. Keep the chin level and avoid dropping or rolling the head back. Do not press on your head or stretch against resistance. Stop for pain, dizziness, visual changes, or tingling. Slow neck rolls are one option.
Ankle motion while seated
Seated ankle movement can be explored without standing or balancing. Keep a stable seat and move one foot at a time, gently pointing and flexing the ankle within a comfortable range. The heel can stay on the floor if lifting it feels difficult. Do not use a strap to pull the foot, and do not continue through pain or swelling. If one ankle is newly swollen or painful, seek medical advice rather than testing it with exercise. See easy ankle stretches.
Knee-friendly choices
Avoid deep knee bends unless a clinician has confirmed they are appropriate for you. A beginner does not need to kneel, squat deeply, or sit back on the heels to practice yoga. Choose a chair or supported standing option instead. When seated, keep feet placed where they feel stable and do not force the knees to straighten or bend. If the knee catches, gives way, swells, or hurts, stop and get professional guidance.
Hip movement stays modest
Keep hip movements small and do not force a wide stance or deep stretch. If standing is safe for you, hold a stable support and shift your weight only slightly from one foot to the other, with feet comfortably apart. Skip the shift if it makes you unsteady. Seated beginners can simply notice whether their sitting position feels comfortable; do not press knees outward or pull the legs into a stretch.
Spine and torso movement
Keep the spine in a comfortable position instead of chasing a deeper twist or bend. Sitting or standing, you may turn your upper body a small amount if that feels easy and your clinician has not restricted twisting. Keep your pelvis supported and let the movement come from a comfortable range. Avoid using your arms to lever yourself farther. Skip twists after surgery or when you have been told to avoid them.
Standing balance support
Use a wall or stable counter for support if standing is part of your clinician-approved plan. Stand with feet at a comfortable distance and keep a hand near support. You do not need to close your eyes, lift a leg, or hold a balance pose. If you feel light-headed, unsteady, or afraid of falling, sit down safely and end the standing practice. Ask a clinician about balance concerns before trying standing yoga alone.
A short warm-up
A brief, low-effort warm-up helps you begin gradually without promising a change in symptoms. Start by sitting or standing comfortably and taking a few natural breaths. Then choose one or two small movements that are already safe for you, such as easy hand opening or ankle motion. There is no required number of repetitions. Pause often, and do not use warmth or a warm-up as permission to ignore pain, swelling, or medical restrictions.
A sample beginner sequence
A simple sequence can combine supported breathing and a few small movements, if each is suitable for you. After medical clearance where needed, sit securely and take a comfortable pause. Try gentle hand opening, a small shoulder movement, and seated ankle motion, with rests between them. Add a supported standing weight shift only if your balance and clinician’s advice allow it. This is an example, not a prescription; leave out any part that does not feel safe.
Keep the first practice brief
A short first attempt makes it easier to observe your response without turning practice into a test. Choose a few minutes rather than aiming for a long session. There is no universal duration or schedule for people with joint stiffness. Finish before fatigue changes your balance or control. Notice how you feel during the practice and afterward, then use that information when deciding what to discuss with your clinician before making the routine longer or more demanding.
Rest is part of the plan
Rest between movements whenever you need to regain comfort, steadiness, or easy breathing. You can pause with your hands supported and feet stable, or end the practice. Do not treat rest as failure. Fatigue can make movements less controlled and may increase the chance of a misstep. If you repeatedly need to stop because of pain, breathlessness, dizziness, or unusual weakness, pause the routine and seek professional advice.
Avoid comparison and challenge poses
A beginner routine should not be judged by how closely it resembles an advanced class. Skip deep lunges, full lotus, long kneeling holds, forceful backbends, inversions, and poses that require you to bear weight through a painful joint unless a qualified clinician has specifically cleared them. A video instructor cannot see your symptoms or medical history. Choose an option that feels stable for you, not one that looks more impressive.
Clothing, temperature, and timing
Choose conditions that let you focus on safe movement rather than discomfort or rushing. Wear layers if temperature affects how comfortable you feel, and choose a time when you are not hurried. Avoid practicing when you are drowsy, dizzy, or distracted. A clear floor and good lighting matter more than special equipment. Do not apply heat or cold as a treatment based on this article; ask a clinician what is appropriate for your situation.
Make modifications without guilt
Changing a pose or leaving it out is a sensible way to respect your current limits. You can use a chair instead of standing, keep your hands resting instead of lifting them, or shorten the movement. If no version feels comfortable, stop rather than inventing a more forceful variation. Tell a yoga teacher about the limits given by your clinician, and choose a teacher who welcomes questions and does not pressure students to push through pain.
Yoga teacher versus clinician
A yoga teacher can guide a class, but a clinician addresses medical symptoms and individual health decisions. Look for an instructor who offers options, avoids hands-on adjustments unless clearly consented to, and treats pain as a reason to pause. A teacher’s experience does not replace diagnosis or clearance. Share only the health information you are comfortable sharing, but communicate relevant movement restrictions so the class can be adapted safely.
When to stop immediately
End the session if you develop a new warning symptom or your movement becomes unsafe. Stop for sudden or severe pain, new swelling, a hot joint, numbness, weakness, dizziness, faintness, unusual breathing difficulty, or a sense that the joint may give way. Sit or lie down in a safe position if needed and seek medical help appropriate to the symptom. Sudden severe symptoms or symptoms after serious injury warrant urgent care, not another yoga attempt.
Track patterns, not diagnoses
A brief symptom note can help you communicate clearly with a health professional. Record the date, what you were doing, where you felt stiffness, how long it lasted, and any other symptoms. Note whether the movement was new, whether you rested, and what happened afterward. Do not label the cause yourself or use a chart to decide that a condition is harmless. The purpose is to support a more useful conversation with a clinician.
Questions to take to an appointment
Ask for specific movement guidance rather than a general yes-or-no answer about yoga. You might ask which joints or directions need protection, whether seated practice is suitable, what symptoms mean stop, and whether a physical therapist can tailor movement. Mention the activities you hope to do and any equipment available at home. Follow the clinician’s advice about timing and restrictions, and ask again if your symptoms or health circumstances change.
Use online videos carefully
A video is general instruction and cannot assess your symptoms or correct your movement in real time. Prefer beginner sessions that offer chair options, invite breaks, and say not to push through pain. Watch the full description and avoid routines promising to cure arthritis or eliminate stiffness. Keep the volume low enough to hear your body, and stop the video whenever the pace or pose feels wrong. Do not assume a popular instructor’s sequence is safe for your condition.
After-practice check-in
Reassess how you feel and do not assume that more movement is always better. Sit quietly for a moment and notice whether any symptom is new, stronger, or different. If a movement seems to have aggravated symptoms, do not repeat it to confirm the effect. Share persistent or concerning changes with a clinician. A comfortable session does not prove that a medical problem is absent, and discomfort does not identify its cause.
What yoga can and cannot offer
Yoga is a way to explore movement, not a substitute for medical assessment or care. A gentle, adapted practice may offer a structured opportunity to move with attention, but individual responses differ and no result is guaranteed. It cannot establish why a joint feels stiff, rule out an injury, or replace a clinician’s care plan. Keep prescribed treatment and follow-up decisions with your healthcare team, and do not stop medication because a class or article suggests doing so.
A calm starting point
The safest first step is the one that fits your health advice and feels controlled today. If a clinician has cleared you, begin with a stable seat, an easy breath, and only a few movements that are comfortable and permitted. Use support, take rests, and stop when warning symptoms appear. If you have not yet checked persistent or unexplained stiffness, arrange that conversation before starting. A careful approach is more useful than forcing a pose or following a fixed routine.
Where to read next
For a calm, beginner-friendly start, Ranjana Sinha’s Begin Where You Are is written for people who want simple steps. Our guide to starting a home yoga practice adds a gentle routine you can follow at home.
Frequently asked questions
Can yoga cure stiff joints?
No, yoga cannot be described as a cure, and joint stiffness should be discussed with a clinician when persistent or concerning.
Should beginners push through joint pain?
No, stop for sharp, increasing, or unusual pain and seek medical advice when symptoms persist or concern you.
Is chair yoga an option for stiff joints?
A chair may offer support for some people, but ask a clinician if you are unsure whether it suits your condition.
How long should a beginner practice?
There is no universal duration, so follow clinician guidance and begin briefly only when movement is appropriate for you.
Which yoga poses should I avoid?
Avoid any pose that causes symptoms or conflicts with medical advice, especially deep or forceful positions without individual clearance.
The bottom line
Joint stiffness deserves attention, not pressure to stretch harder. Get medical guidance for persistent, unexplained, or significant symptoms, then choose supported movements that fit the advice you receive. Keep the range small, take breaks, and stop for warning signs. This guide is general education, not a personal exercise plan.